Germplasm Menu
The Germplasm Menu contains various pages with tools that can be used to manage germplasm data and related data.
The following pages of the Germplasm Menu illustrate the order of dependency:
This order of dependency means that a genus must first be created for a genotype to be added to it, and a genotype must exist for a specimen to be added to it as well.
Genus
The Genus Page contains a list of all genus that are contained in KDDart. Genus refers to a logical grouping of genotypes which may optionally be botanically related.
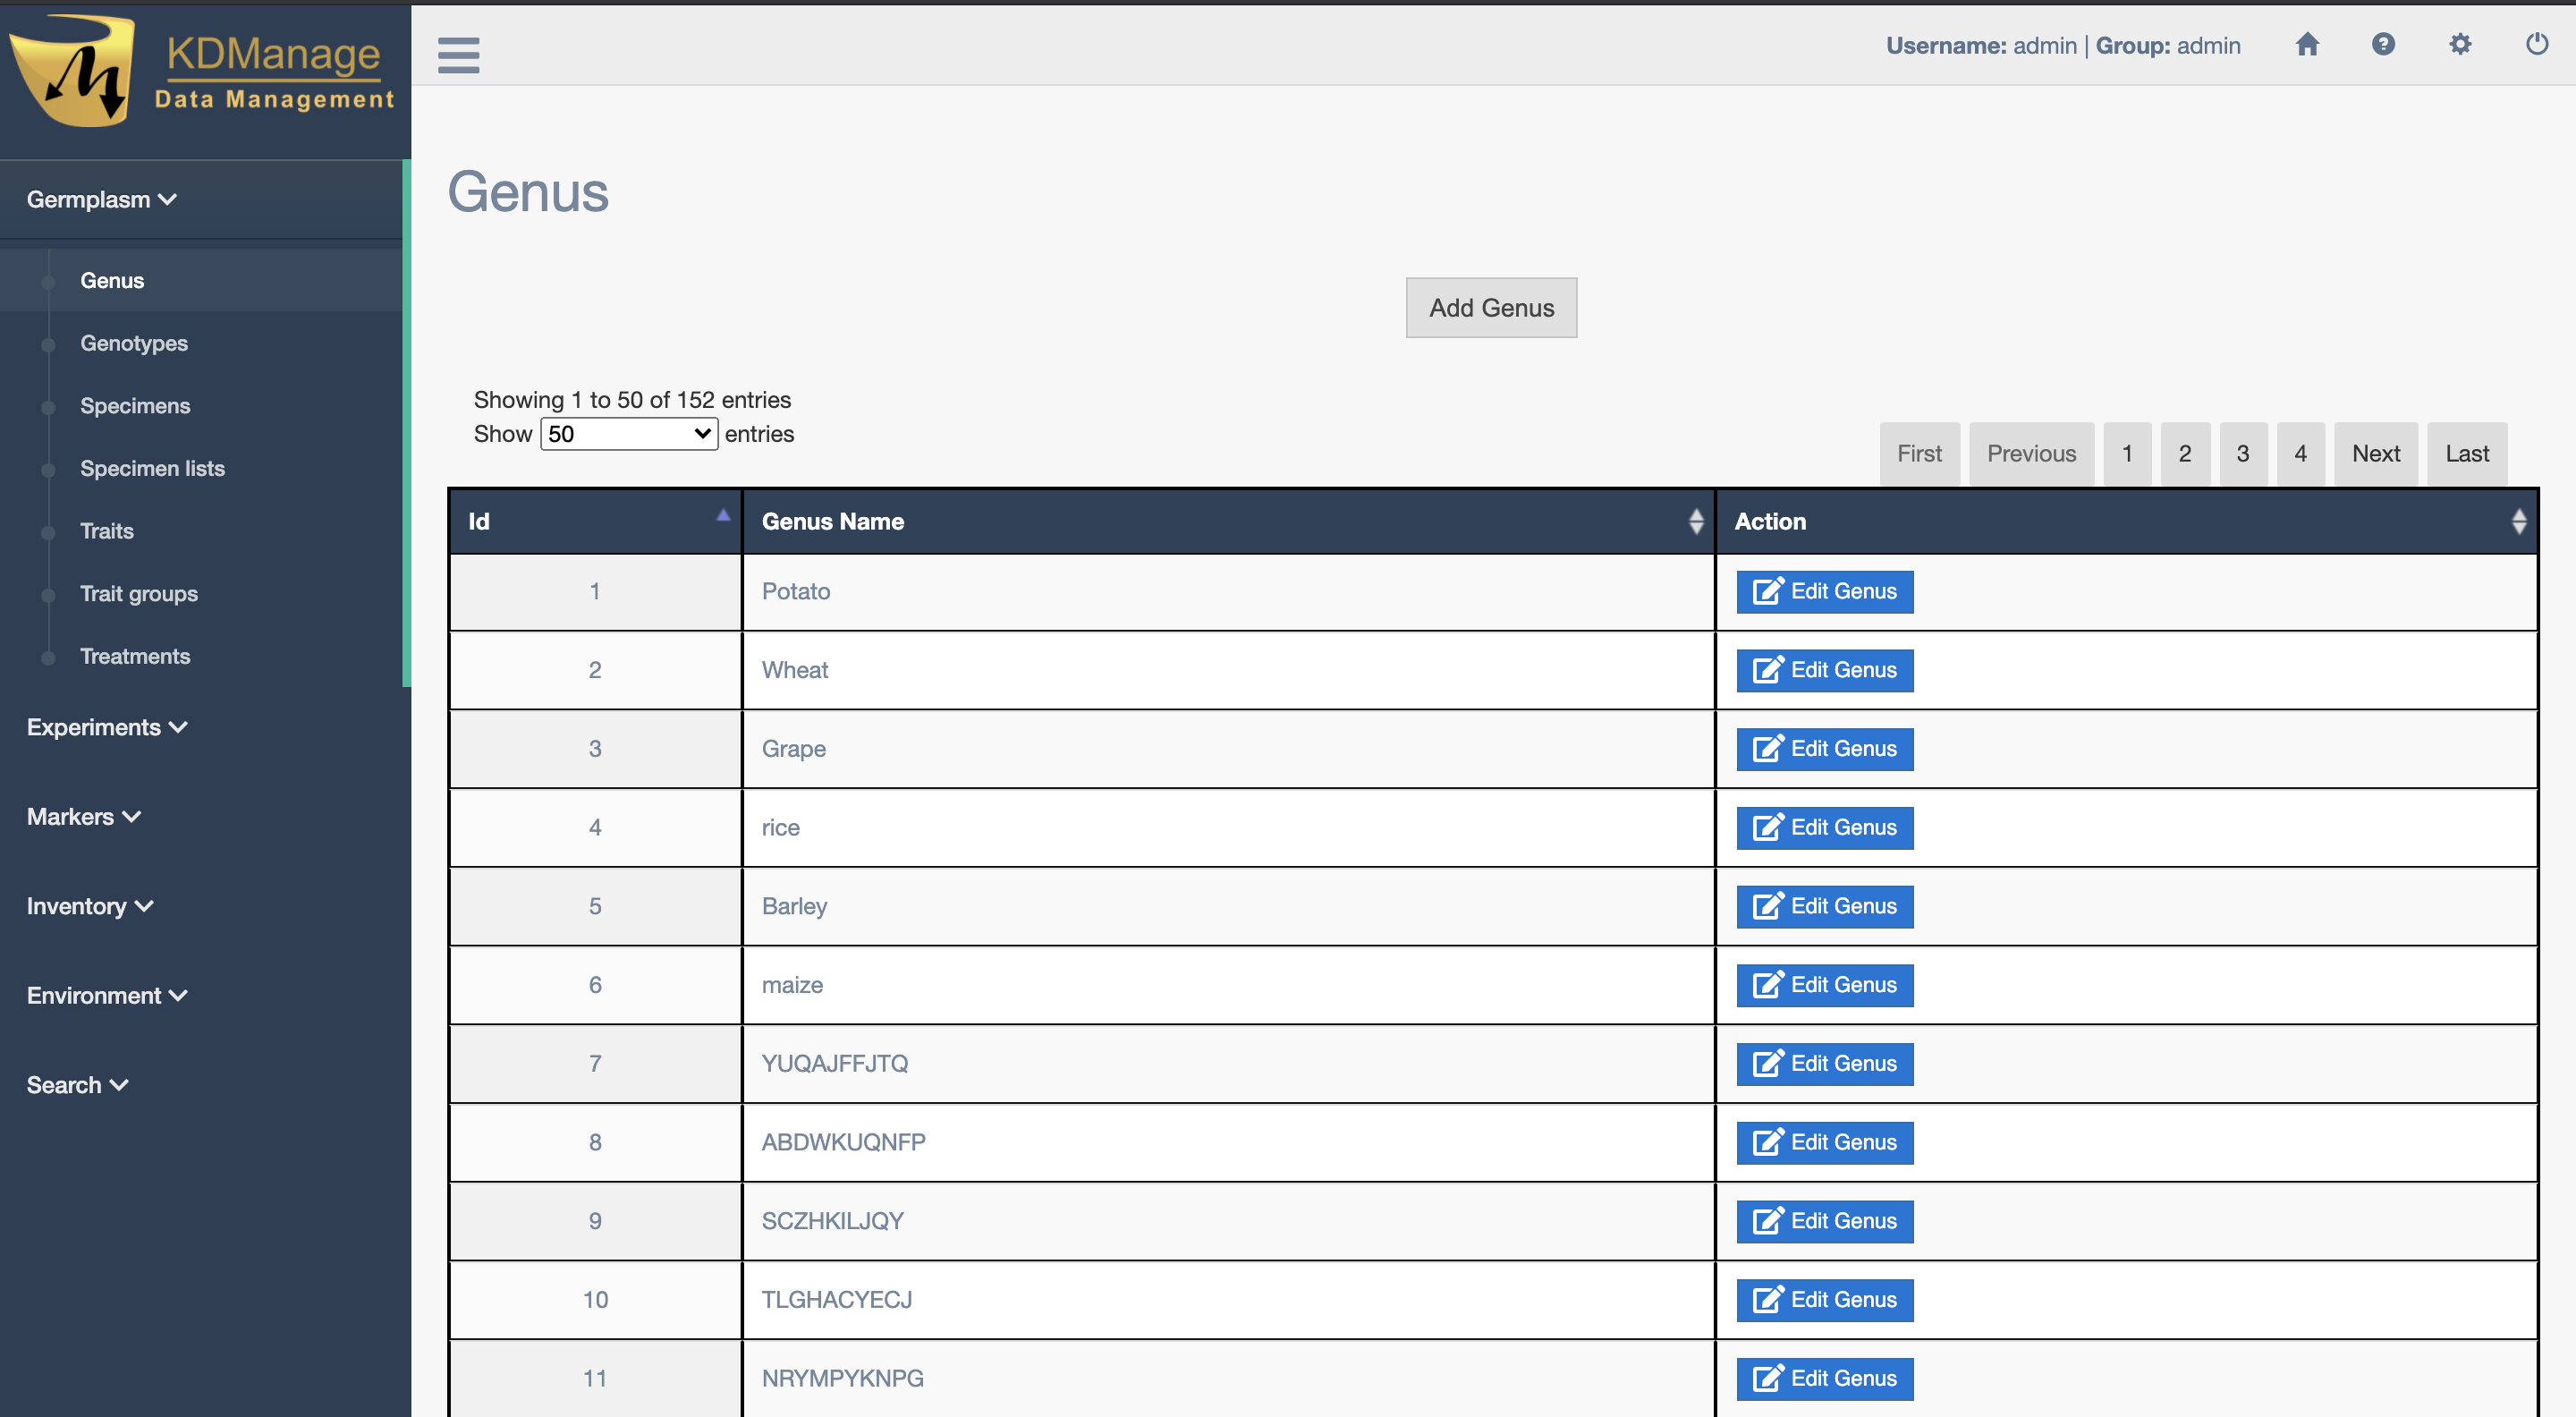
A new genus can be added to KDDart by selecting the Add Genus Button which displays the Add Genus Window as seen in the image below:

Once created in KDDart, the name of a genus may be edited by selecting the  Edit Button of the required genus.
Genotype
Genotype refers to the set of an individual’s genes. Each genotype in KDManage is listed in the Genotypes Page. A synonym for genotype can be variety and should be used as a generic category. As stated in the order of dependency, each genotype must be associated with a genus.
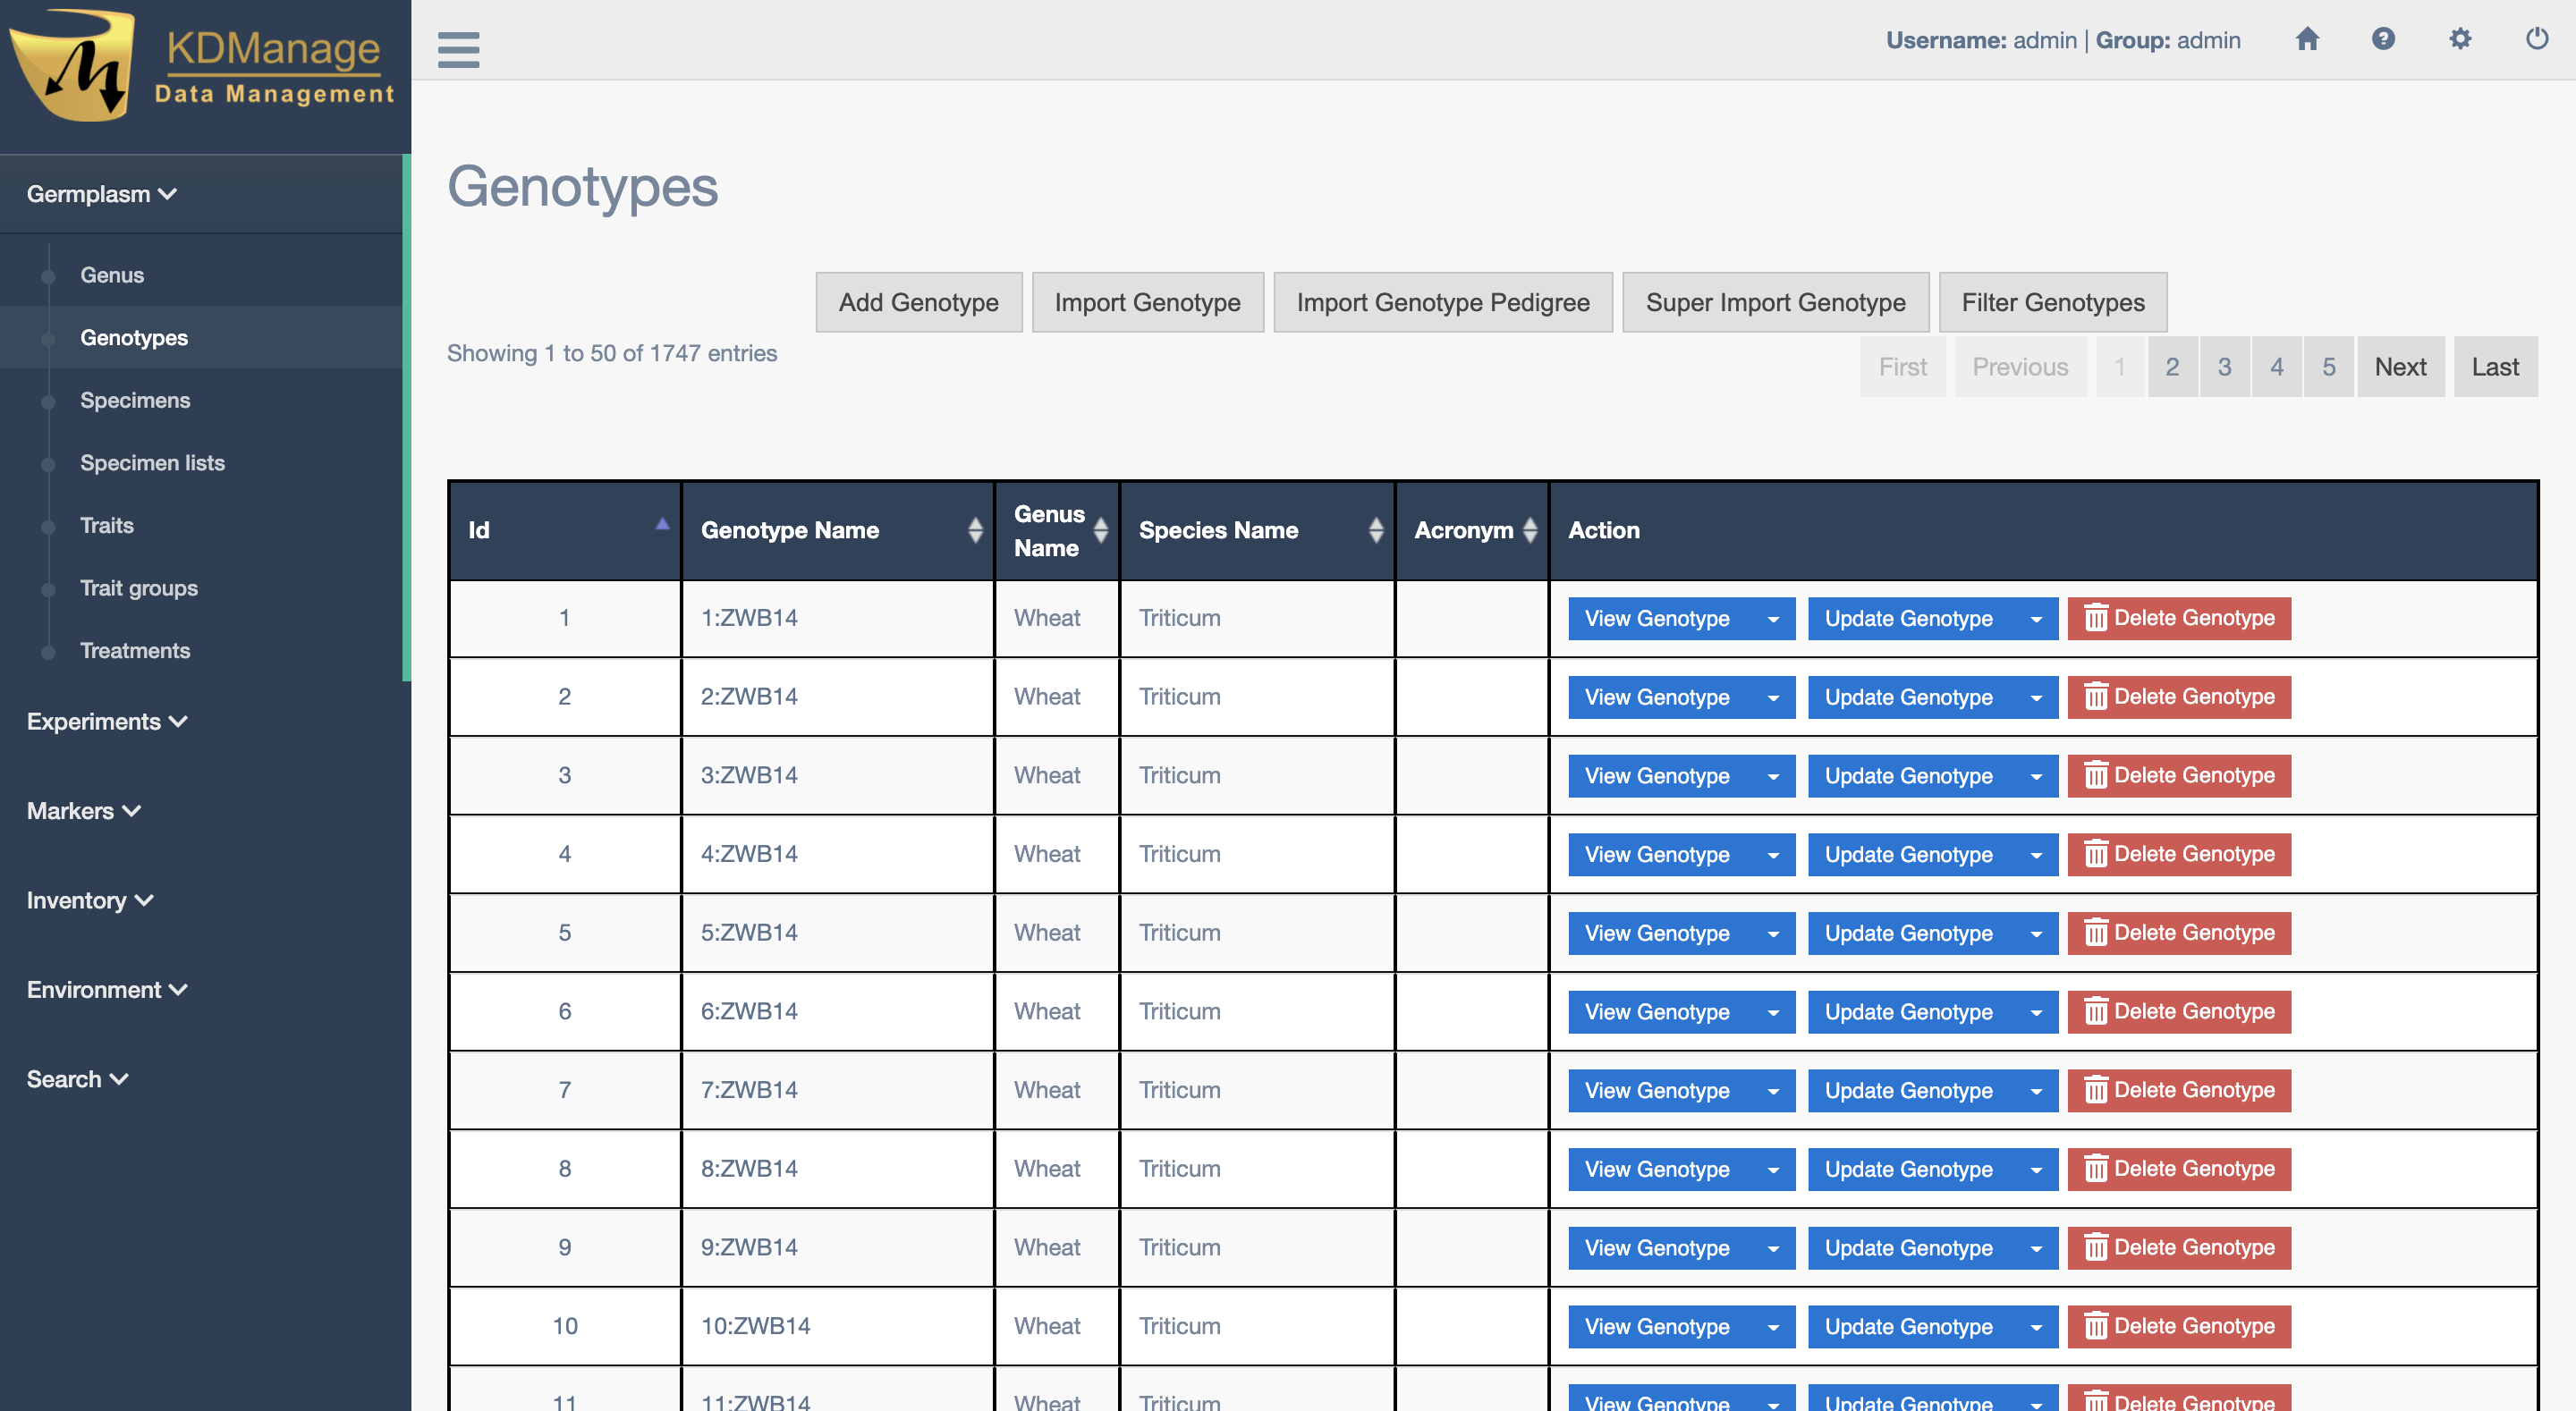
Genotype records may either be entered manually or imported from a file (see the Import Genotype section).
To add a genotype manually, select the Add Genotype Button on the Genotypes Page which will open the Add Genotype Window. The window and a table describing the fields for manual genotype addition can be seen below:
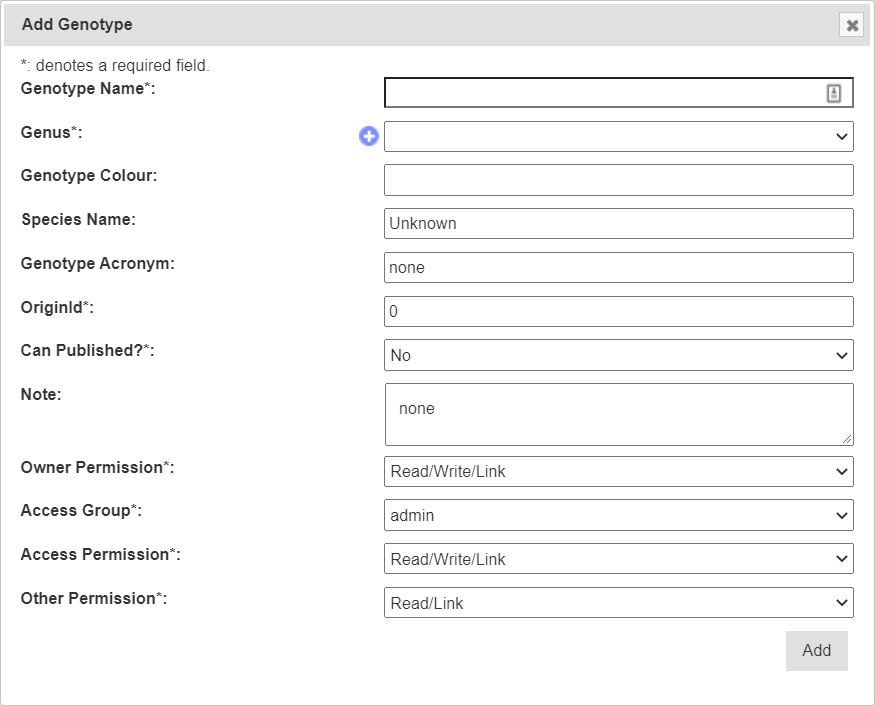
| Field | Mandatory? | Description |
|---|---|---|
| Genotype Name | Mandatory | The name of the genotype. |
| Genus | Mandatory | The name of the genus that the gennotype belongs to. Select the  or go to the Genus Page to create a new genus. or go to the Genus Page to create a new genus. |
| Genotype Colour | Can be used for plant variety rights information. | |
| Species Name | Latin name - common naming conventions should be established. | |
| Genotype Acronym | Abbreviated name of genotype. | |
| OriginId | Mandatory | Source Identifier - possible part of plant variety rights information - could refer to organisation or contact. |
| Can be Published | Mandatory | Indicate if genotype is publicly available. |
| Note | Any notes regarding the genotype. | |
| Access Fields | Mandatory | Access and permissions. See the Access Settings and Permissions topic. |
Genotype Actions
For the management of Genotypes, there are various actions to help manage Genotypes. The following table explains what they do and use cases:
| Action | Description | Parent Button |
|---|---|---|
| View Genotype | Link to Genotype page | |
| List Genotype Alias | List all alias for genotype | View Genotype |
| List Genotype Trait | List all assigned traits for genotype | View Genotype |
| Show Pedigree of Genotype | Show Pedigree chart of Genotype | View Genotype |
| Update Genotype | Update Genotype Information | |
| Add Genotype Alias | Add an alias to a Genotype | Update Genotype |
| Add Genotype Trait | Add an assigned trait to a Genotype | Update Genotype |
| Merge Genotype | Reassign another Specimens of another Genotype and attach them to current Genotype. | Update Genotype |
| Clone Genotype | Create another Genotype with fields of current Genotype copied over to new Genotype and allow an explict pedigree link to the two Genotypes | |
| Create Specimen | Create a new Specimen and link it to current Genotype |
Import Genotype
New genotype records may be imported into KDDart and if required, specimens for the genotype records can be automatically created within the process.
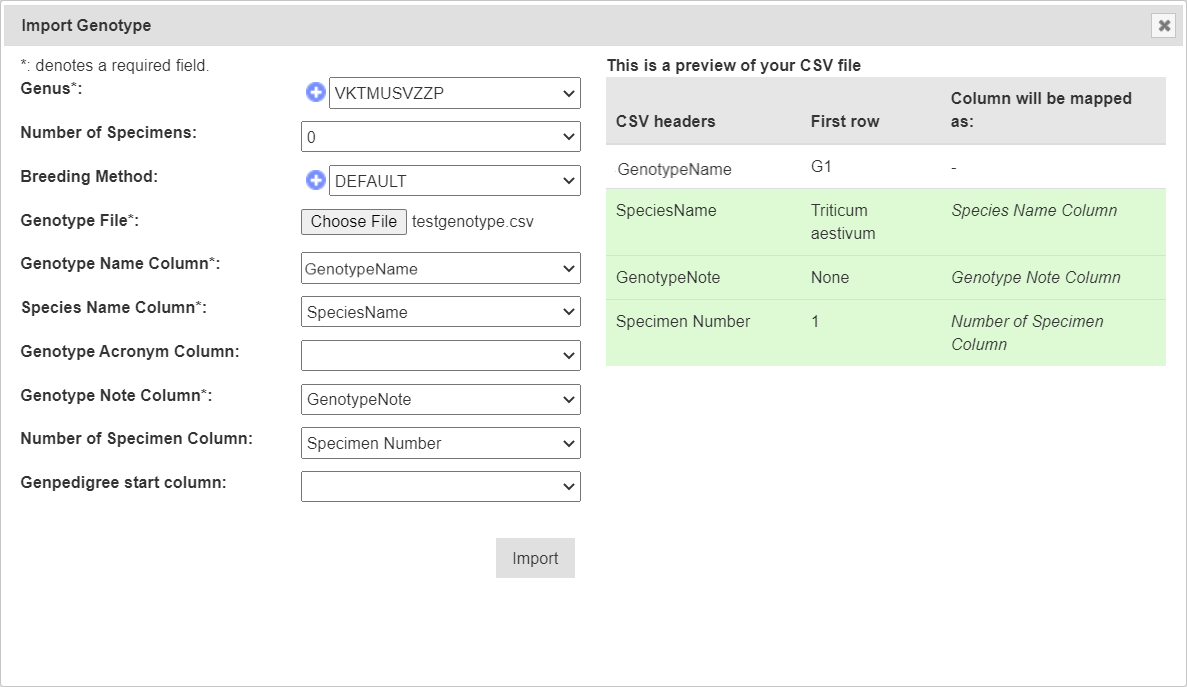
Select the Import Genotype Button to display the Import Genotype Window (pictured below). The following image and table show the fields required in an input file to import genotypes and create specimens if required.
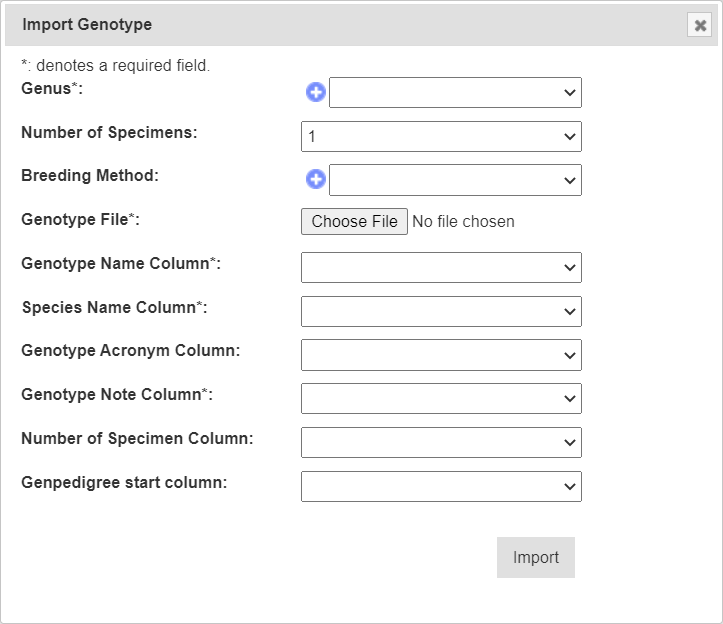
| Field | Mandatory? | Description |
|---|---|---|
| Genus | Mandatory | The genus name for the genotypes. |
| Breeding Method | Select from the list of breeding methods (Use Default if not required/important) | |
| Number of Specimens | A value must be selected from 0-9. The value specified here applies to all genotype records being imported unless overridden by the Number of Specimen Column (see the example below). | |
| Genotype File | Mandatory | Select the input file for the import. |
| Genotype Name Column | Mandatory | Column number for genotype name. |
| Species Name Column | Mandatory | Column number for the species name. |
| Genotype Acronym Column | The acronym column is optional. | |
| Genotype Note Column | Mandatory | Column number for notes regarding the genotype. |
| Number of Specimen Column | The number of specimens to be created for a, individual record (see example below). | |
| Genpedigree Start Column | Begins a genotype name and genotype pedigree type pairings. Use genotype names and type names. |
Access Fields (see the Access Settings and Permissions topic) do not appear in the Import Genotype Window. These fields are automatically set with the owning group set to the group used to perform the import as follows:
| Group | Privilege |
|---|---|
| Owner (Group used for import) | Read & Write |
| Access | Read & Link |
| Public | Read & Link |
When importing genotypes from a file, KDManage can optionally create specimens for each or selected genotypes if required. The following applies to the import window:
- Number of ‘Specimens greater than zero’ - The specified number of specimen records will be created for each genotype record imported unless overridden by the individual record.
- Numeric value in the ‘Number of Specimen Column’ - Directs the import to check that column in the file for each record and create the specified number of specimens for the genotype. Within the file where a:
- Value for a record = blank - The Number of Specimens value entered will apply for the genotype.
- Value for a record = zero - No specimen will be created for the genotype.
- Zero < Value < 10 - This number (value) of specimens will be created for the genotype.
Import Genotype Example
The following example shows a small genotype input CSV file:

The following image shows the completed import fields for this file.
The import file shown above will create five genotype records and four specimen records when imported using the following KDManage form settings.
Note
The records in the file with a zero in the specimen number column will not have a specimen record created.
After a successful import, all genotypes will be available in the list of the Genotypes Page as seen below:

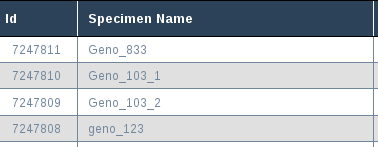
Another example below shows how specimens that were automatically created based when genotypes were imported. Note how the specimen name was treated when:
- A single specimen is created the specimen name matches the genotype name
- Multiple specimens are created for a genotype, the specimen name is given the genotype name with a numeric suffix (e.g. for a genus called ‘GenoA’, specimen names would be GenoA__1, GenoA__2, etc).
Import Genotype with Genpedigree Example
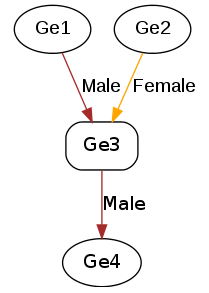
Genpedigree entries can also be included in the CSV by including each Genpedigree pair following the column specified in the window. See the example below:

Tip
Parents listed in CSV can either be genotypes that are in the CSV or existing genotypes that have already been added or imported.
This will result in the following genpedigree being created for genotype Ge3:
Import Genpedigree
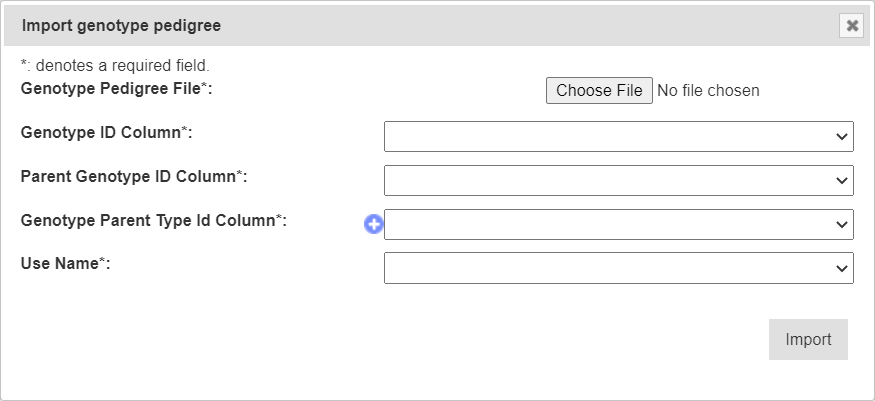
New Genpedigree entries for existing genotypes can also be imported. Select the Import Genotype Pedigree Button to display the Import Genotype Pedigree Window as seen in the image below (along with a table to outline the fields):
Note
The Import Genotype Pedigree Window will match column names once users select a file for import.
| Field | Mandatory? | Description |
|---|---|---|
| Genpedigree File | Mandatory | Select the input file for the import. |
| Genotype ID Column | Mandatory | Column number for genotype ID. These are the children genotypes. |
| Parent Genotype ID Column | Mandatory | Column number for parent genotype ID. These are the parent genotypes. |
| Genotype Parent Type ID Column | Mandatory | Column number for genotype parent type ID. |
| Use Name | Mandatory | Flags whether to use genotype ID or genotype name. |
Genotype Alias
Genotypes may also have a genotype alias added to help with identifying. To add an alias to a genotype, find the required genotype in the list on the Genotypes Pages then select “Add Genotype Alias” (under  dropdown) to display the Add Genotype Alias Window. The window and a table that explain the related fields can be found below:
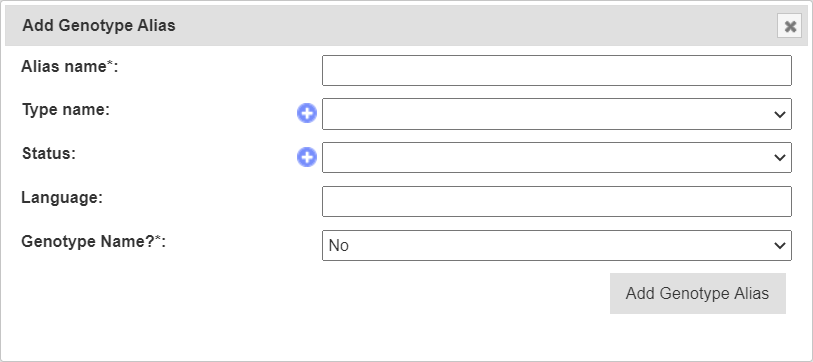
| Field | Mandatory? | Description |
|---|---|---|
| Alias Name | Mandatory | Alias name for genotype. |
| Type Name | Alias type. | |
| Status | Status of alias. | |
| Language | Language of alias. | |
| Genotype Name? | Flag that alias is genotype name or not. |
Genotype Super Import
The Genotype Super Import provides a single function whereby multiple genotypes can be created, updated or replaced in a single csv. The aliases, genpedigrees and traits of these genotypes can also be included in the import. This function enables bulk uploads/updates of genotypes into the system.
Prerequisite: Before the Genotype Super Import can be used, a .csv file containing the relevant data must be prepared. This .csv file should contain the columns listed within the Genotype Super Import Form.
Where a genotype already exists, the row will be ignored unless a flag from below is set to allow for updates:
- Update Existing Genotype - determines whether existing genotypes should be updated with given information.
- Replace Existing Pedigree - determines whether existing genotype pedigree for an existing genotype should be replaced with given information.
- Create Specimens - determines whether a corresponding set of specimens should be created with the genotypes. NOTE: this will only work when creating new genotypes.
To use the Genotype Super Import, select the Super Import Genotype button to display the Super Import Genotype window.
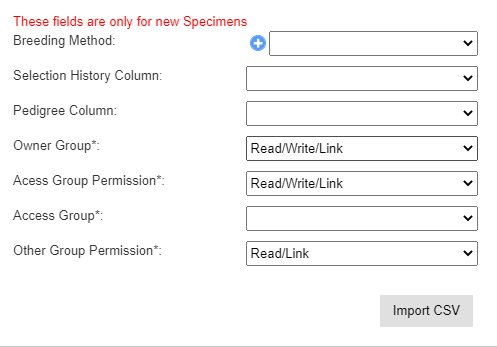
The following illustration shows the Super Import Genotype window, it displays the fields which represent the columns required for the super import to run.
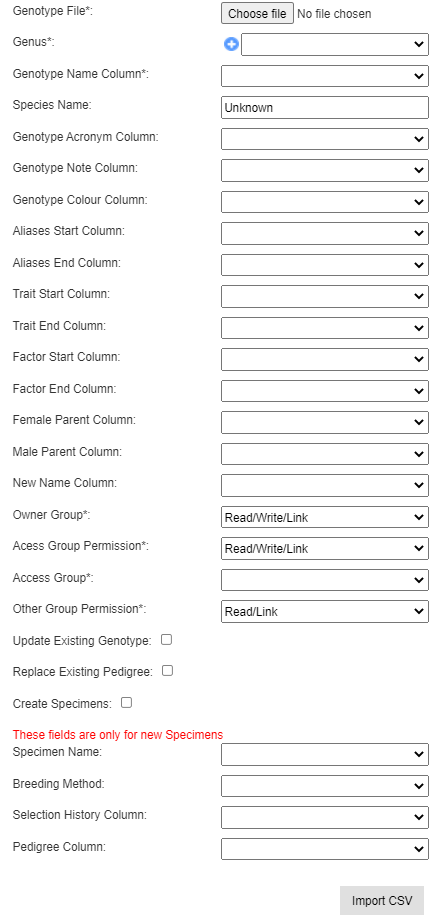
| Field | Mandatory? | Description |
|---|---|---|
| Genotype File | Mandatory | The prepared .csv file containing the columns below. |
| Genus | Mandatory | Dropdown to select the Genus of given genotypes. |
| Genotype Name Column | Mandatory | The column that contains the names of the given genotypes. |
| Species Name | Textfield to select the species of given genotypes. | |
| Genotype Acronym Column | The column that contains the acronym for given genotypes. | |
| Genotype Note Column | The column that contains the note for given genotypes. | |
| Aliases Start Column | The starting column that contains the aliases for given genotypes. | |
| Aliases End Column | The ending column that contains the aliases for given genotypes. | |
| Trait Start Column | The starting column that contains the traits for given genotypes. | |
| Trait End Column | The ending column that contains the traits for given genotypes. | |
| Factor Start Column | The starting column that contains the factors for given genotypes. | |
| Factor End Column | The ending column that contains the factors for given genotypes. | |
| Female Parent Column | The column that contains the female parent for given genotypes. | |
| Male Parent Column | The column that contains the male parent for given genotypes. | |
| New Name Column | The column that contains the new name for given genotypes. | |
| Update Existing Genotype | Flag to determine whether existing genotypes should be updated with given information. | |
| Replace Existing Pedigree | Flag to determine whether existing genotype pedigree for an existing genotype should be replaced with given information. | |
| Create Specimens | Flag to determine whether a corresponding set of specimens should be created with the genotypes. NOTE: this will only work when creating new genotypes. | |
| Breeding Method | (Only required if creating specimens) Dropdown to select the breeding method of the specimens to be created. | |
| Selection History Column | (Only required if creating specimens) The column that contains the selection history for the specimens to be created. | |
| Pedigree Column | (Only required if creating specimens) The column that contains the pedigree for the specimens to be created. | |
| Owner Group | M | Dropdown to select the owner’s access permissions to given genotypes. |
| Access Group Permission | M | Dropdown to select the access group’s access permissions to given genotypes. |
| Access Group | M | Dropdown to select the access group to given genotypes. |
| Other Group Permission | M | Dropdown to select the other groups’ permissions to given genotypes. |
Note
Since genotypes can have an arbitrary number of aliases, traits, and factors, this import function requires that the start and end columns for them. This means:
- The columns for aliases, traits and factors must be next to each other.
- If there is only a single column, the start and end columns will be the same.
Once the .csv file has been uploaded under Genotype File, an additional view will be generated in the window that contains al the columns of the .csv file.
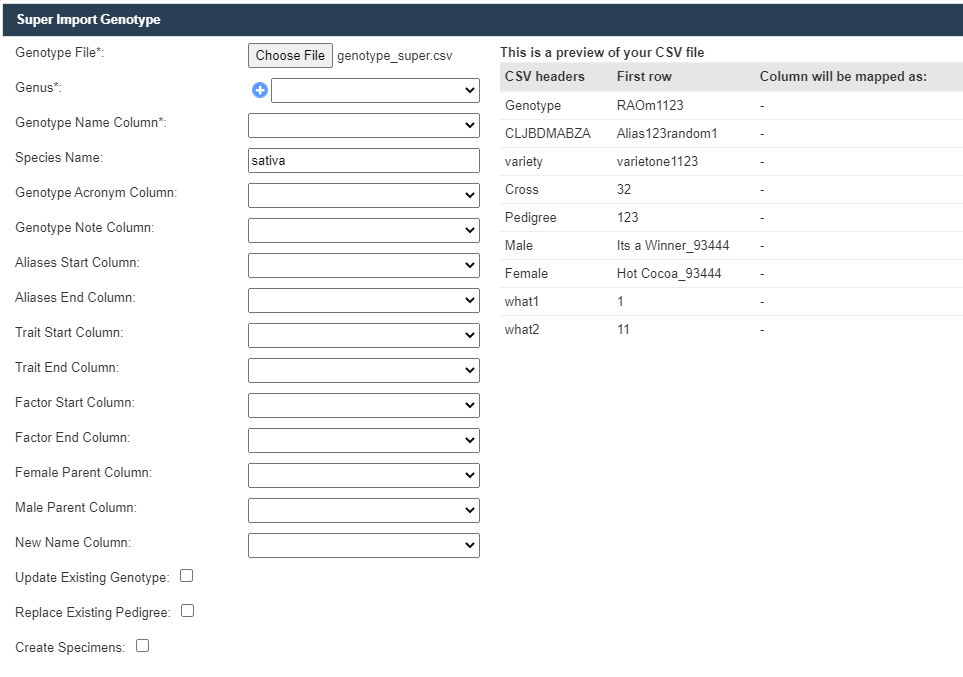
Now, the remaining fields can be selected using the dropdowns to match the requisite columns to the columns that exist within the uploaded file.
The existing columns on the right will turn green when they have been selected once, and turn red if they have been selected more than once. In the case where the starting and ending columns are the same, the super import function will still complete despite the column highlighting as red.
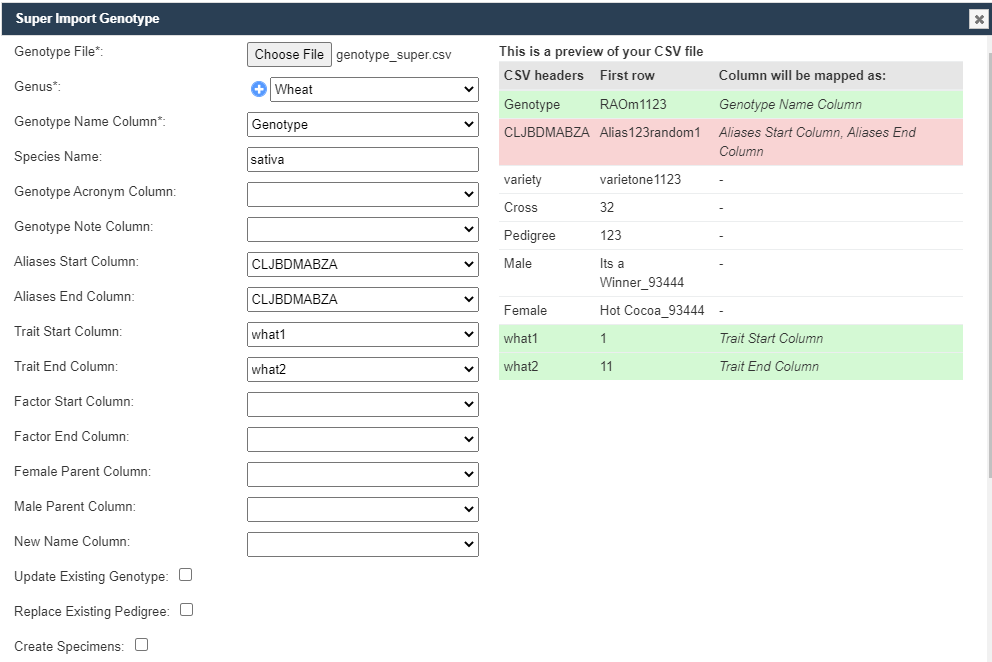
Once all the needed columns have been selected, click the Import CSV button to run the super import. When the super import completes, a prompt should be shown with a report on the super import.
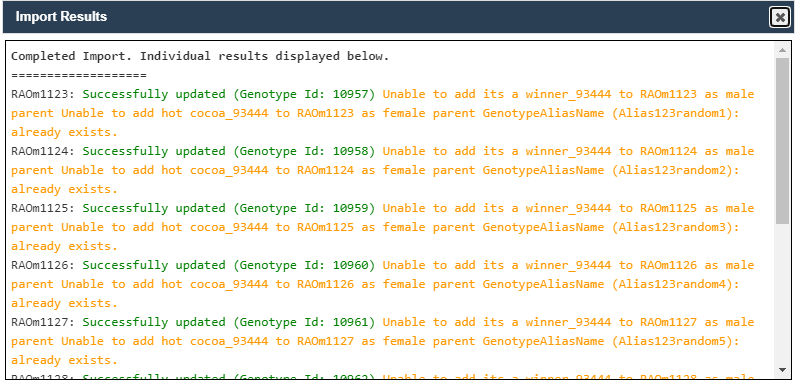
The report will include the status of each row. Green denotes a success while yellow denotes a warning.
Genotype Data Page
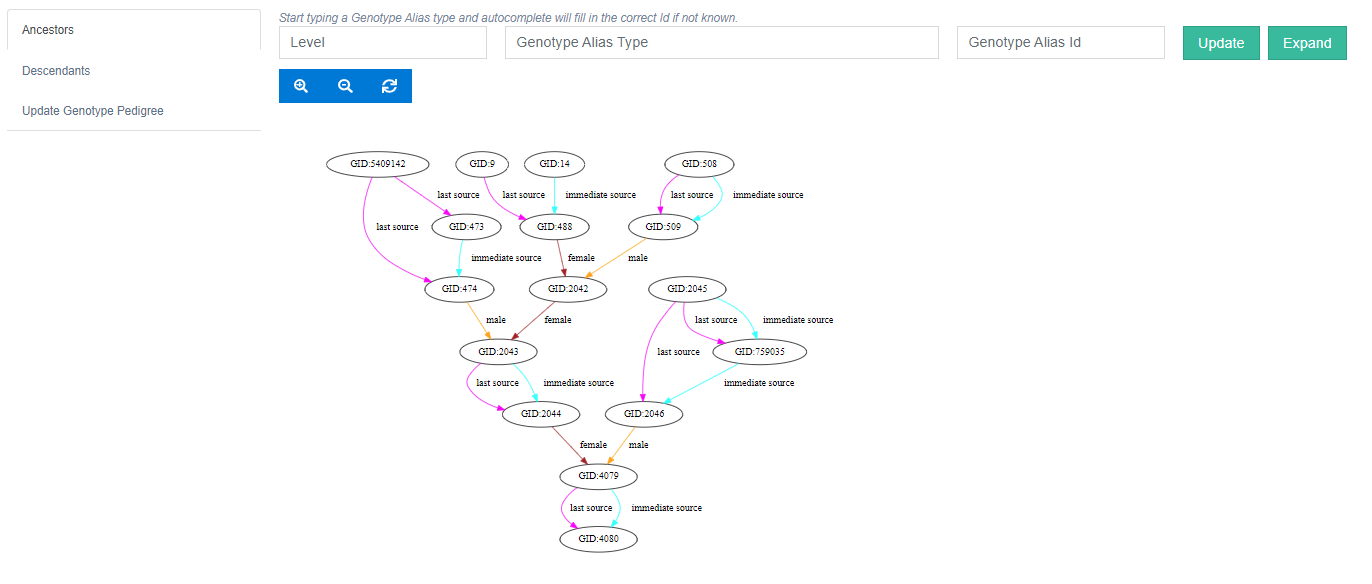
The Genotype Data Page provides the data/details about each genotype that is contained in your KDDart instance.
This can display the following entities related to the genotype being viewed:


Specimen
A specimen is the physical representation of a genotype and this facilitates the recording of vital characteristics such as where and when it was grown.
For example, in horticulture one specimen may be composed of two genotypes (rootstock and scion). The KDDart environment anticipates these scenarios and caters for this requirement.
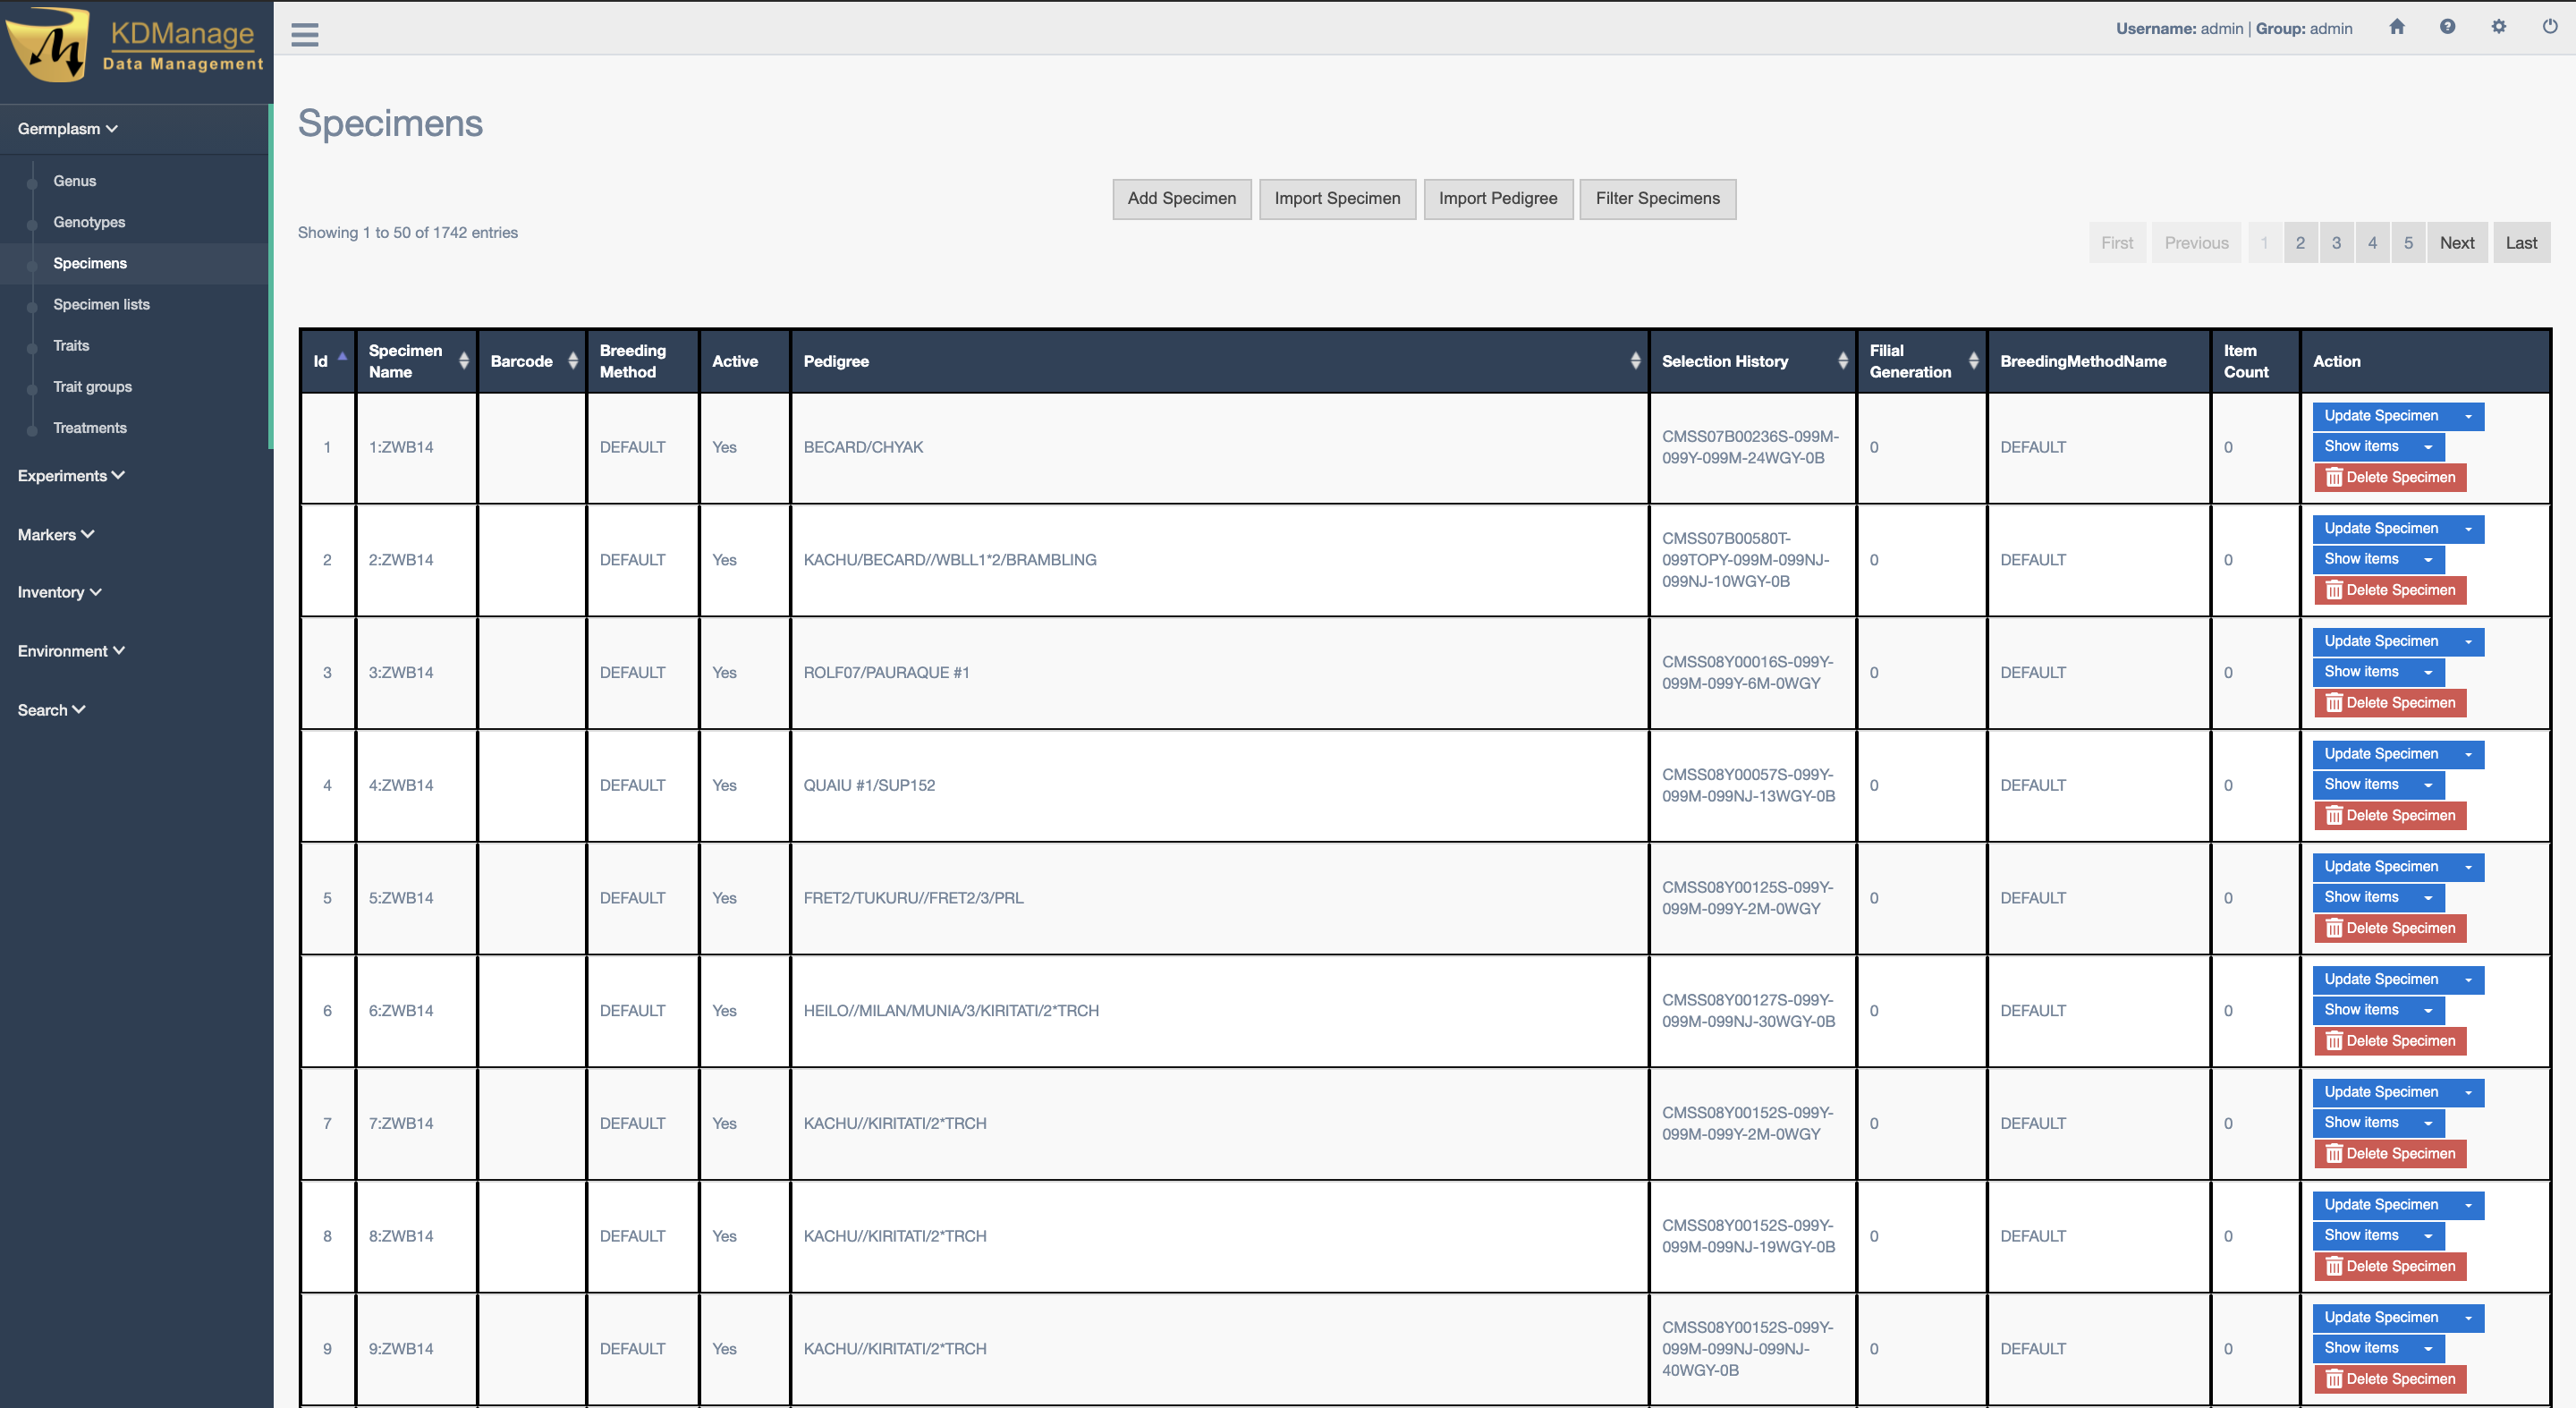
Specimens can also be imported by selecting the Import Specimen Button which will display the Import Specimen Window. An example of the window and a table which explains the relevant fields can be found below:
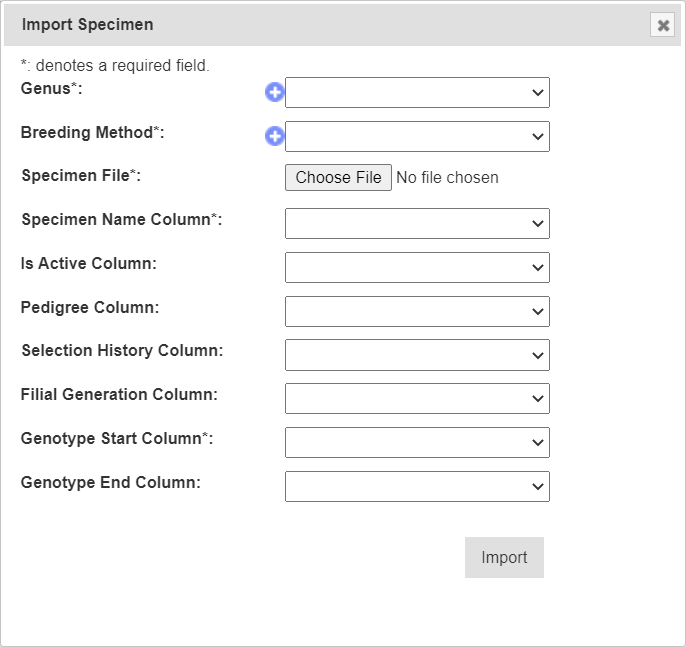
| Field | Mandatory? | Description |
|---|---|---|
| Genus | Mandatory | Select an existing genus for all the specimens in the input file. |
| Breeding Method | Mandatory | Select an existing breeding method for all the specimens in the input file. |
| Specimen File | Mandatory | Browse to locate the input specimen CSV file. |
| Specimen Name Column | Mandatory | The specimen name column in the input file, numbered from zero. |
| Is Active Column | An indicator to show if the specimen is still active (i.e. in production). | |
| Pedigree Column | Could be a generated Purdy string from male and female parent ID (or some other than Purdy standard). | |
| Selection History Column | Optionally siblings clones etc, where genotype name is the same. | |
| Filial Generation Column | Level of specimens being selfed, required when full selection history is unavailable. | |
| Genotype Start Column | Mandatory | The genotype name column in the input file, numbered from zero. |
| Genotype End Column | The second genotype name column in the input file, numbered from zero. |
Import Pedigree
New pedigree entries for existing specimens can be imported by selecting the Import Pedigree Button which will display the Import Pedigree Window. The window is displayed below with a table that details the relevant fields:
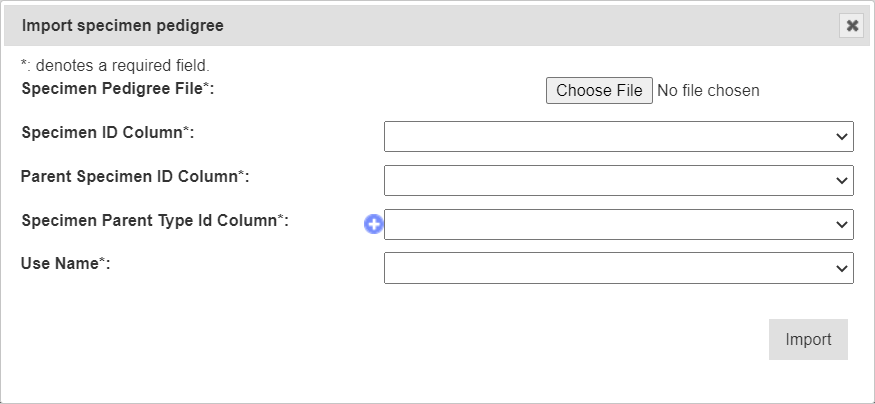
| Field | Mandatory? | Description |
|---|---|---|
| Pedigree File | Mandatory | Select the input file for the import. |
| Specimen ID Column | Mandatory | Column number for specimen ID. These are the children genotypes. |
| Parent Specimen ID Column | Mandatory | Column number for parent specimen ID. These are the parent genotypes. |
| Specimen Parent Type ID Column | Mandatory | Column number for specimen parent type ID. |
| Use Name | Mandatory | Flags whether to use specimen ID or specimen name. |
Specimen Lists
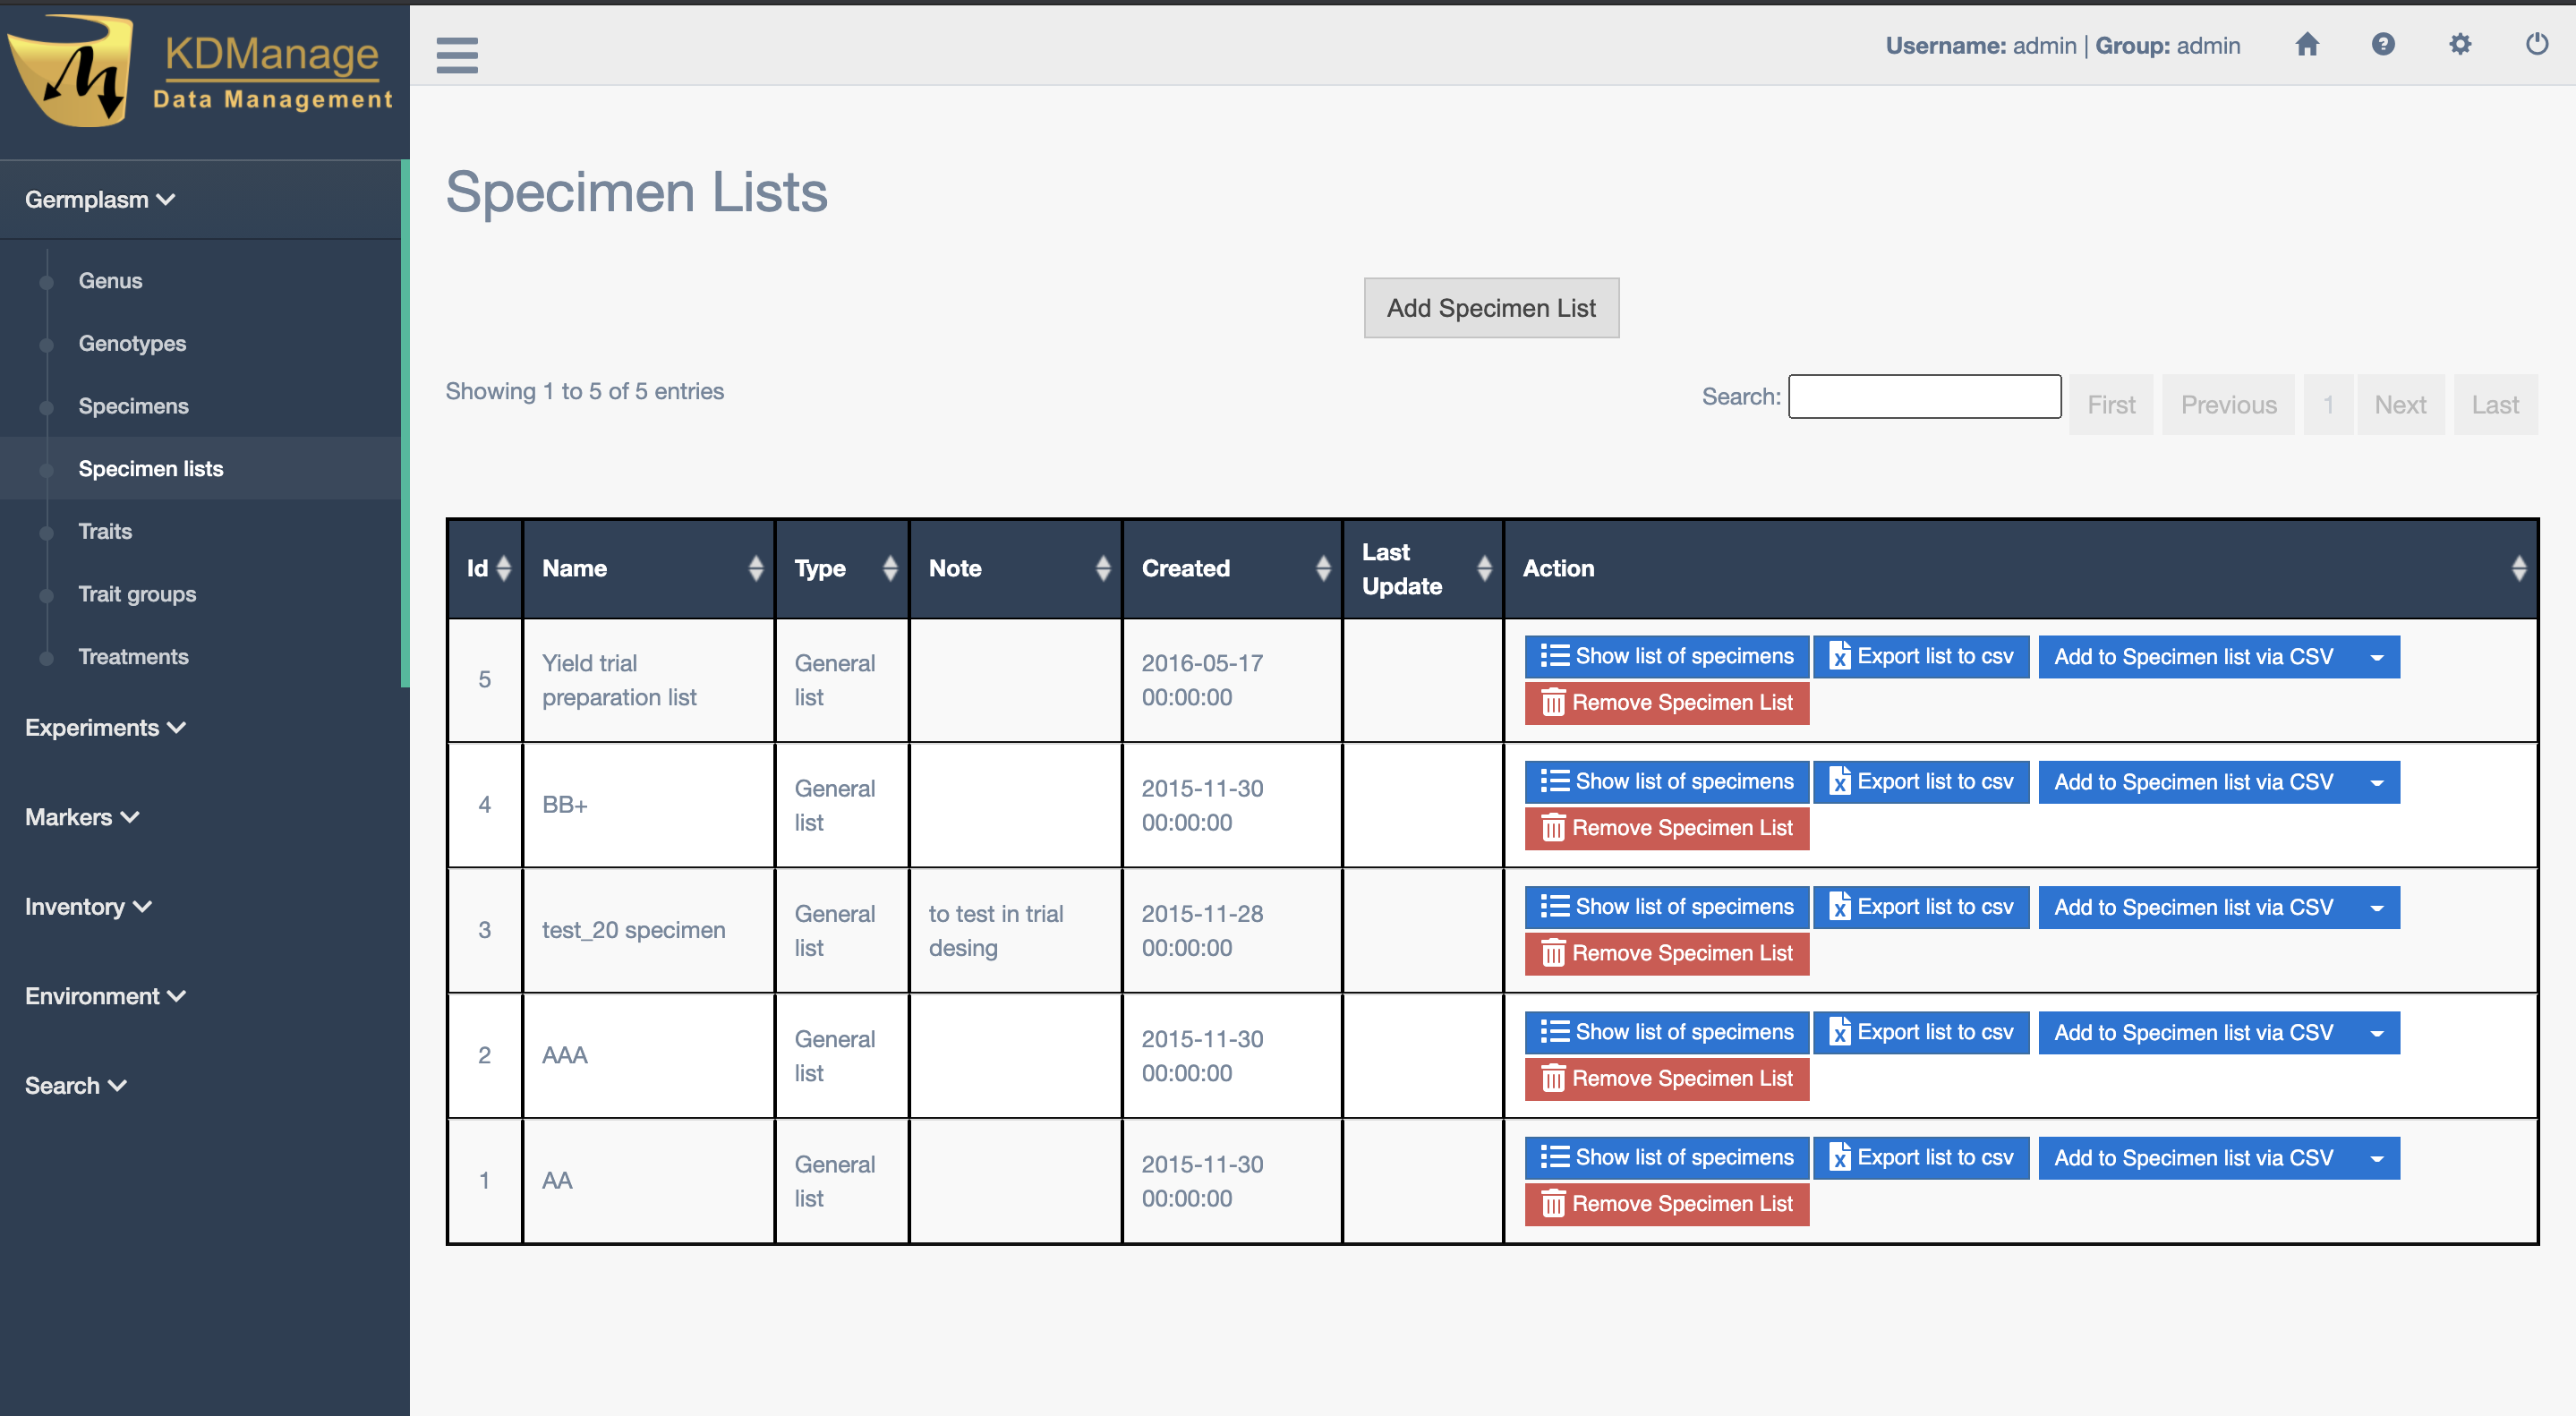
Specimens can be added to specimens lists for an organisation. The Specimen Lists Page can be seen in the image below:
A new specimen list can be added by selecting the Add Specimen List Button which will display the Add Specimen List Window. The window and a table with the relevant fields can be found below:
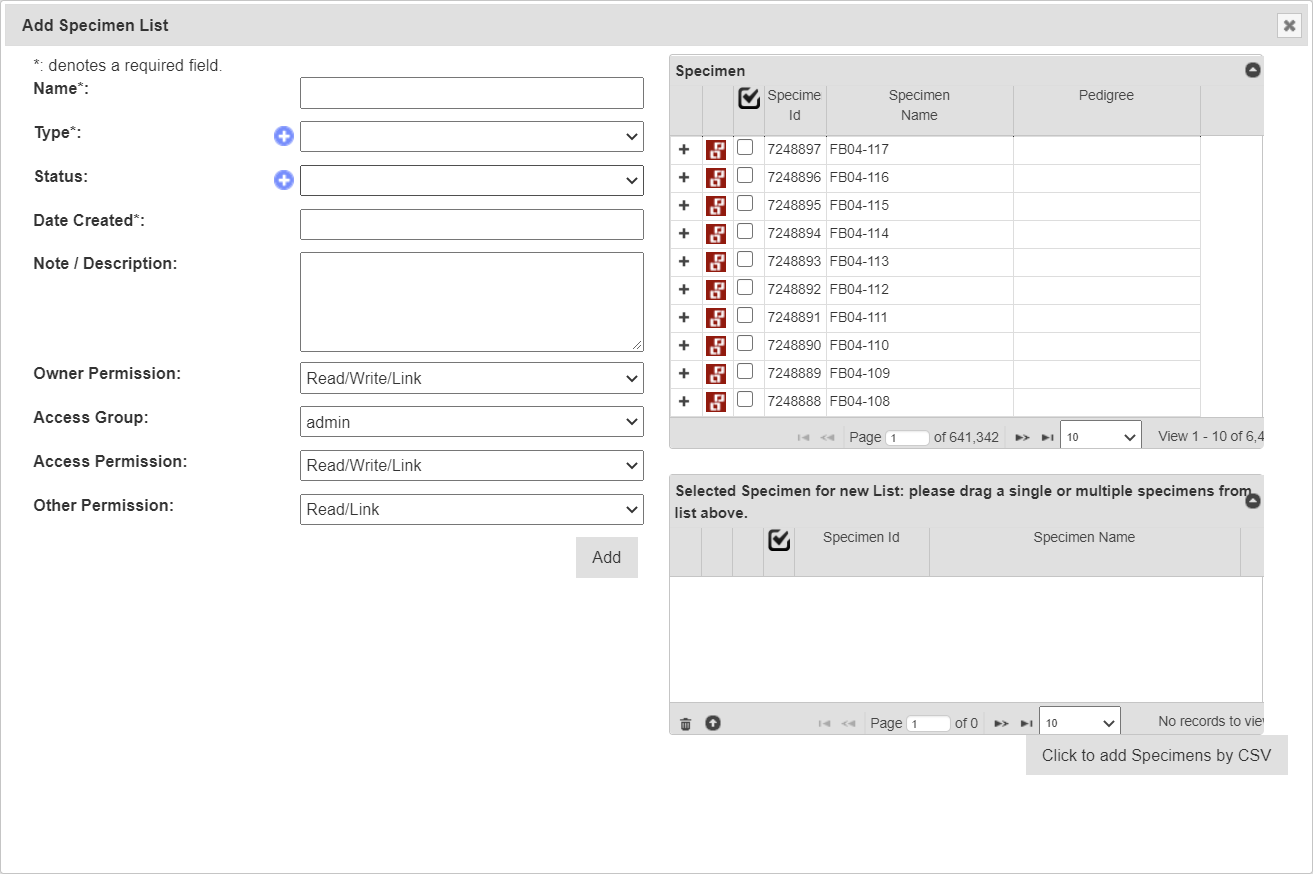
| Field | Mandatory? | Description |
|---|---|---|
| Name | Mandatory | Name of specimen list. |
| Type | Mandatory | Type of specimen list see the Administrative Settings topic. |
| Status | Mandatory | Status of specimen list see the Administrative Settings topic. |
| Date Created | Mandatory | Date that specimen list is created. |
| Note/Description | Notes of specimen list. | |
| Access Fields | Mandatory | Access and permissions. See the Access Settings and Permissions topic. |
Traits
Traits are important descriptors of what is to be measured and what the permissible values are in those measurements. The Trait/Measurement Page enables the definition and quantification of a trait or characteristic of the trial/experiment. This includes a description and notes, the data type, units of measurement, maximum value and validation rule.
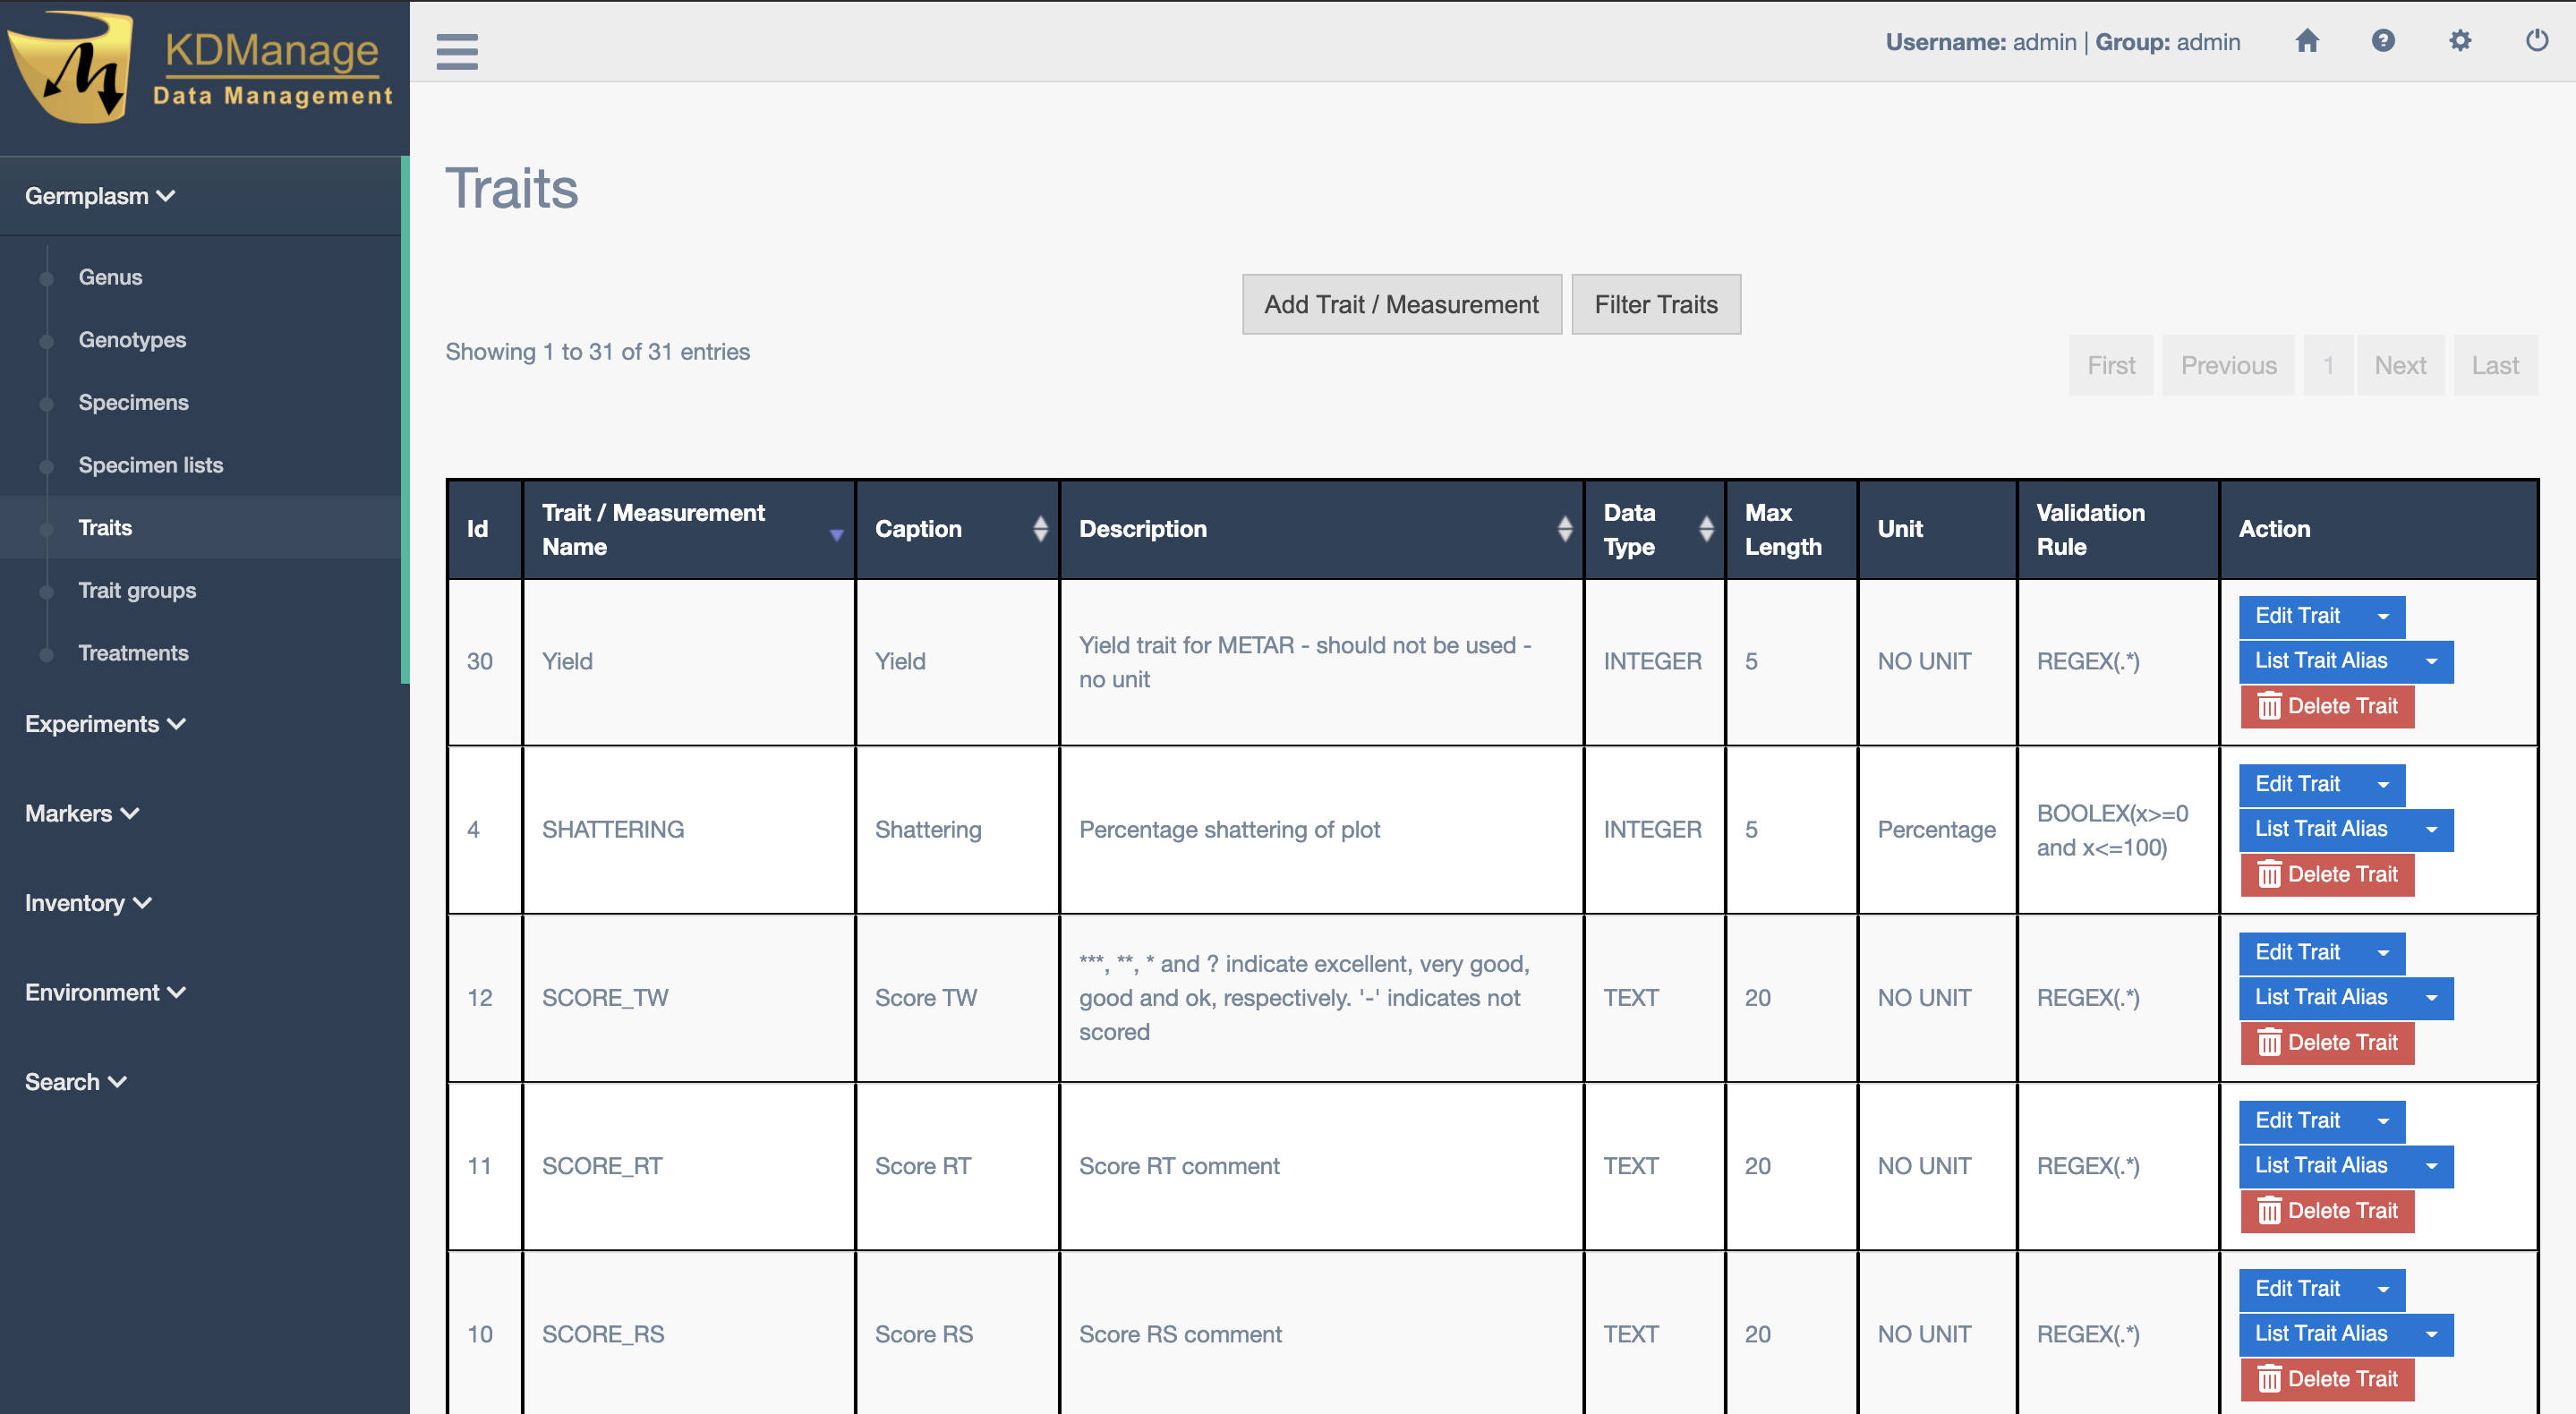
Traits need to be defined before they can be assigned to a trial. Once traits are added here they will appear in the selection list for Add Traits to a Trial.
New traits can be added by selecting the Add Trait Button which displays the Add Trait Window. The window and all fields available in it are demonstrated in the image and table below:
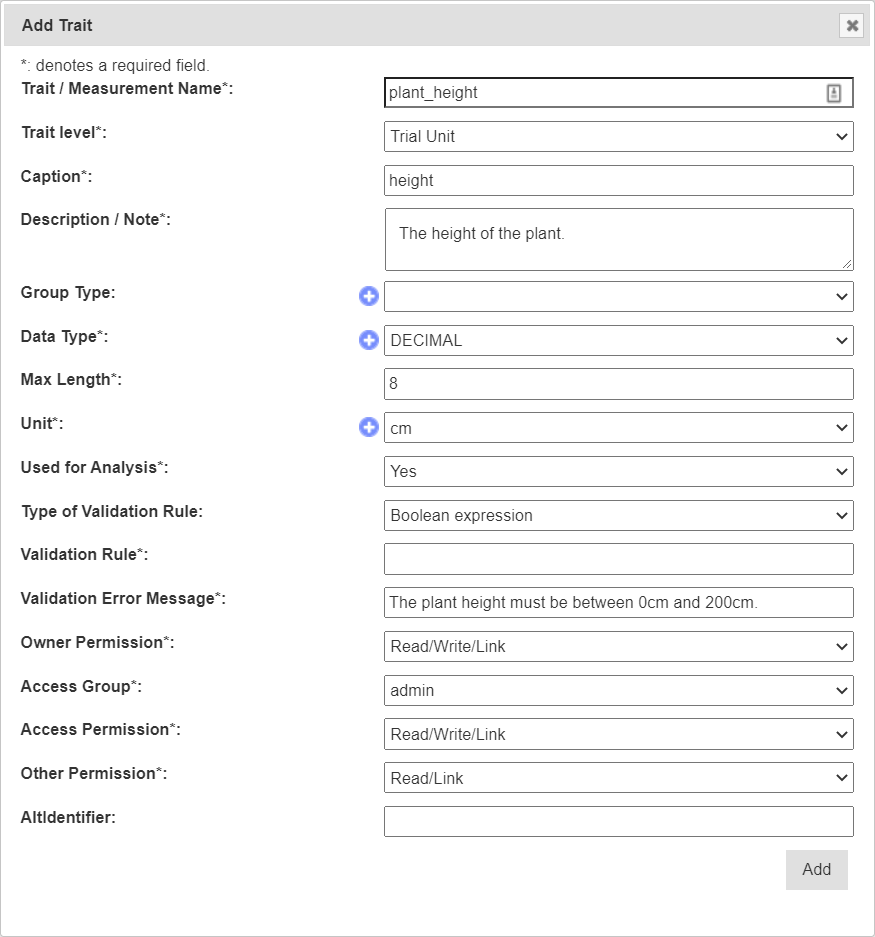
| Field | Mandatory? | Description |
|---|---|---|
| Trait/Measurement Name | Mandatory | The name to identify the trait or measurement. |
| Caption | Mandatory | An abbreviated or shortened trait name (e.g. name without spaces). Could be used for display. |
| Description/Note | Mandatory | A description or note about the trait. |
| Data Type | Mandatory | The trait’s data type. Selection from class Trait Data Type in Types (see Types section in Administrative Settings) |
| Max Length | Mandatory | The maximum length of the value (e.g. 12). |
| Unit | Mandatory | Unit of measurement for the trait (e.g. kg/h, colour, etc). |
| Used for Analysis | Mandatory | May be used as an indicator (e.g export all traits need analysis). |
| Type of Validation Rule | _ | Indicator for the type of validation rule (either a Boolean, Regular, Range or a Choice expression). Upon selecting a rule, a helper will appear that you can use to make sure you use the correct format. |
| Validation Rule | Mandatory | A validation rule for the value of the trait. |
| Validation Error Message | Mandatory | An error message to display when the validation rule criteria is not met. |
| Access Fields | Mandatory | Access and permissions. See the Access Settings and Permissions topic. |
Trait Groups
Traits can be added to trait groups which allows for traits to be added in groups for convenience. Trait groups are listed in the Trait Groups Page as seen in the image below:
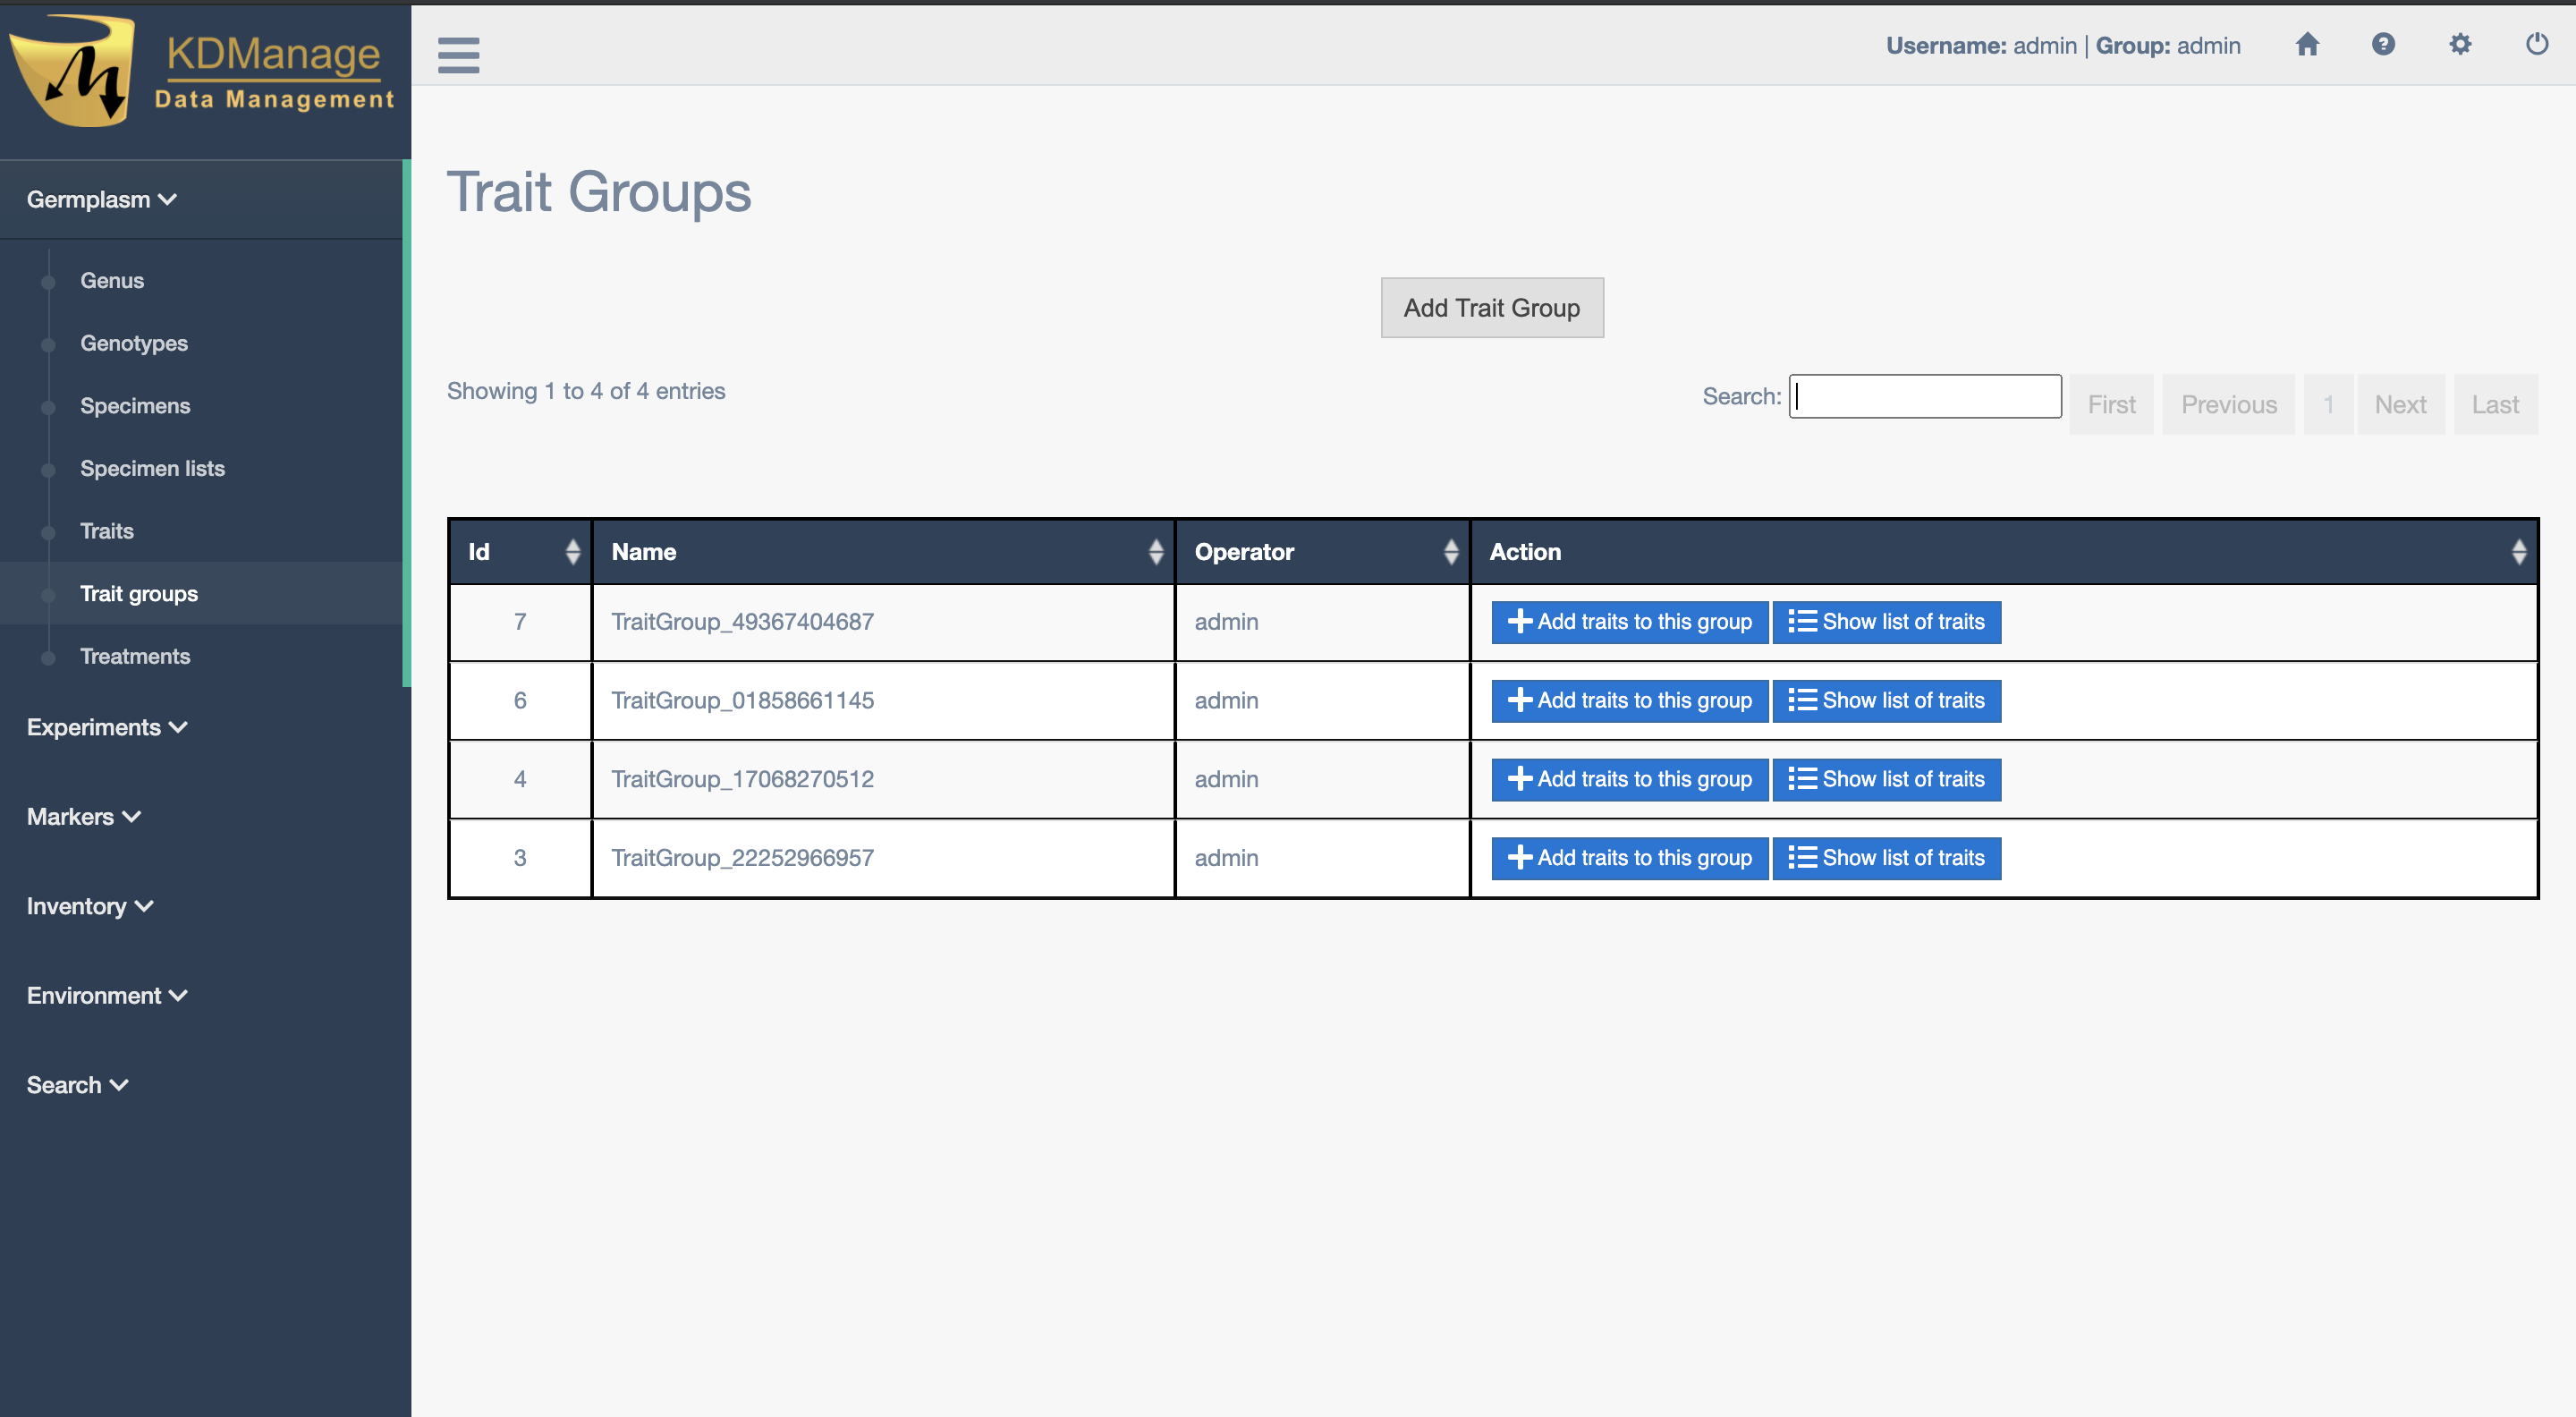
The image below demonstrates a trait group for a wheat trial:
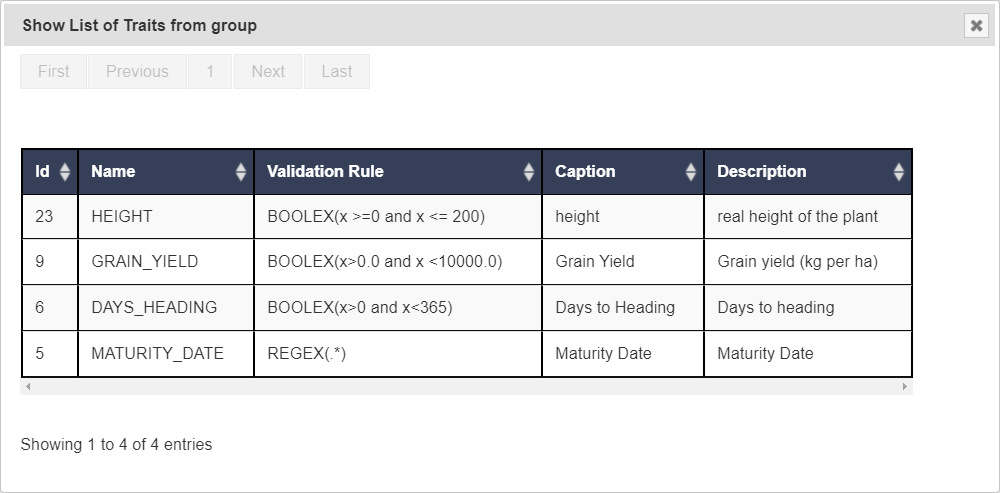
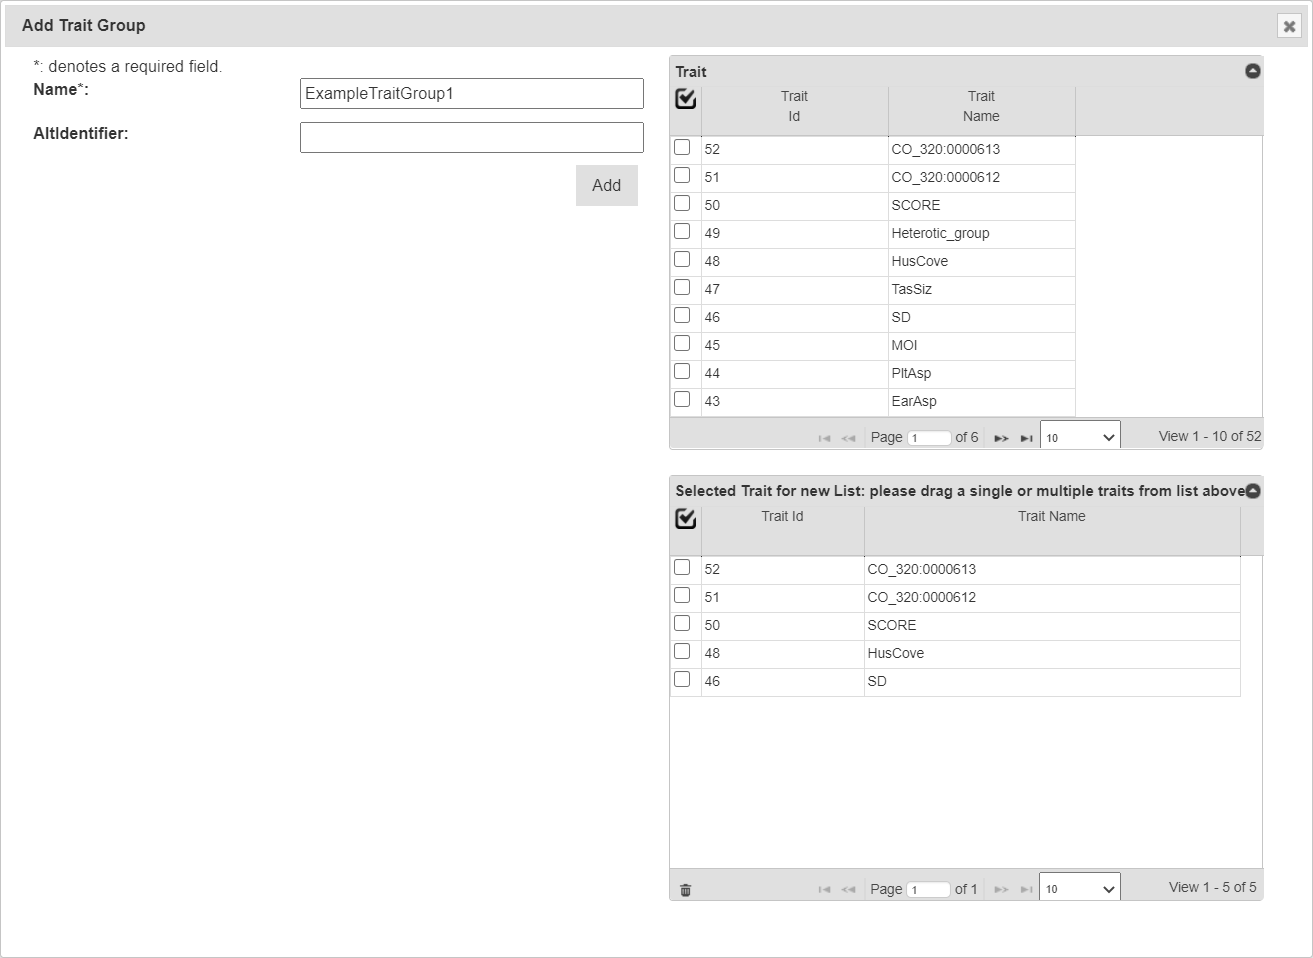
New trait groups can be created by selecting the Add Trait Group Button which will display the Add Trait Group Window (see below) where a name for the new group and traits can be selected.
Note
Traits must already exist in KDDart before they are added to trait groups.
Treatment
Treatment describes or quantifies an action performed on a trial unit to induce a measurable response, such as to a certain level of fertilisation (e.g. adding nitrogen) quantity of irrigation, etc. The Treatment Page lists all treatments that are available in your KDDart instance.
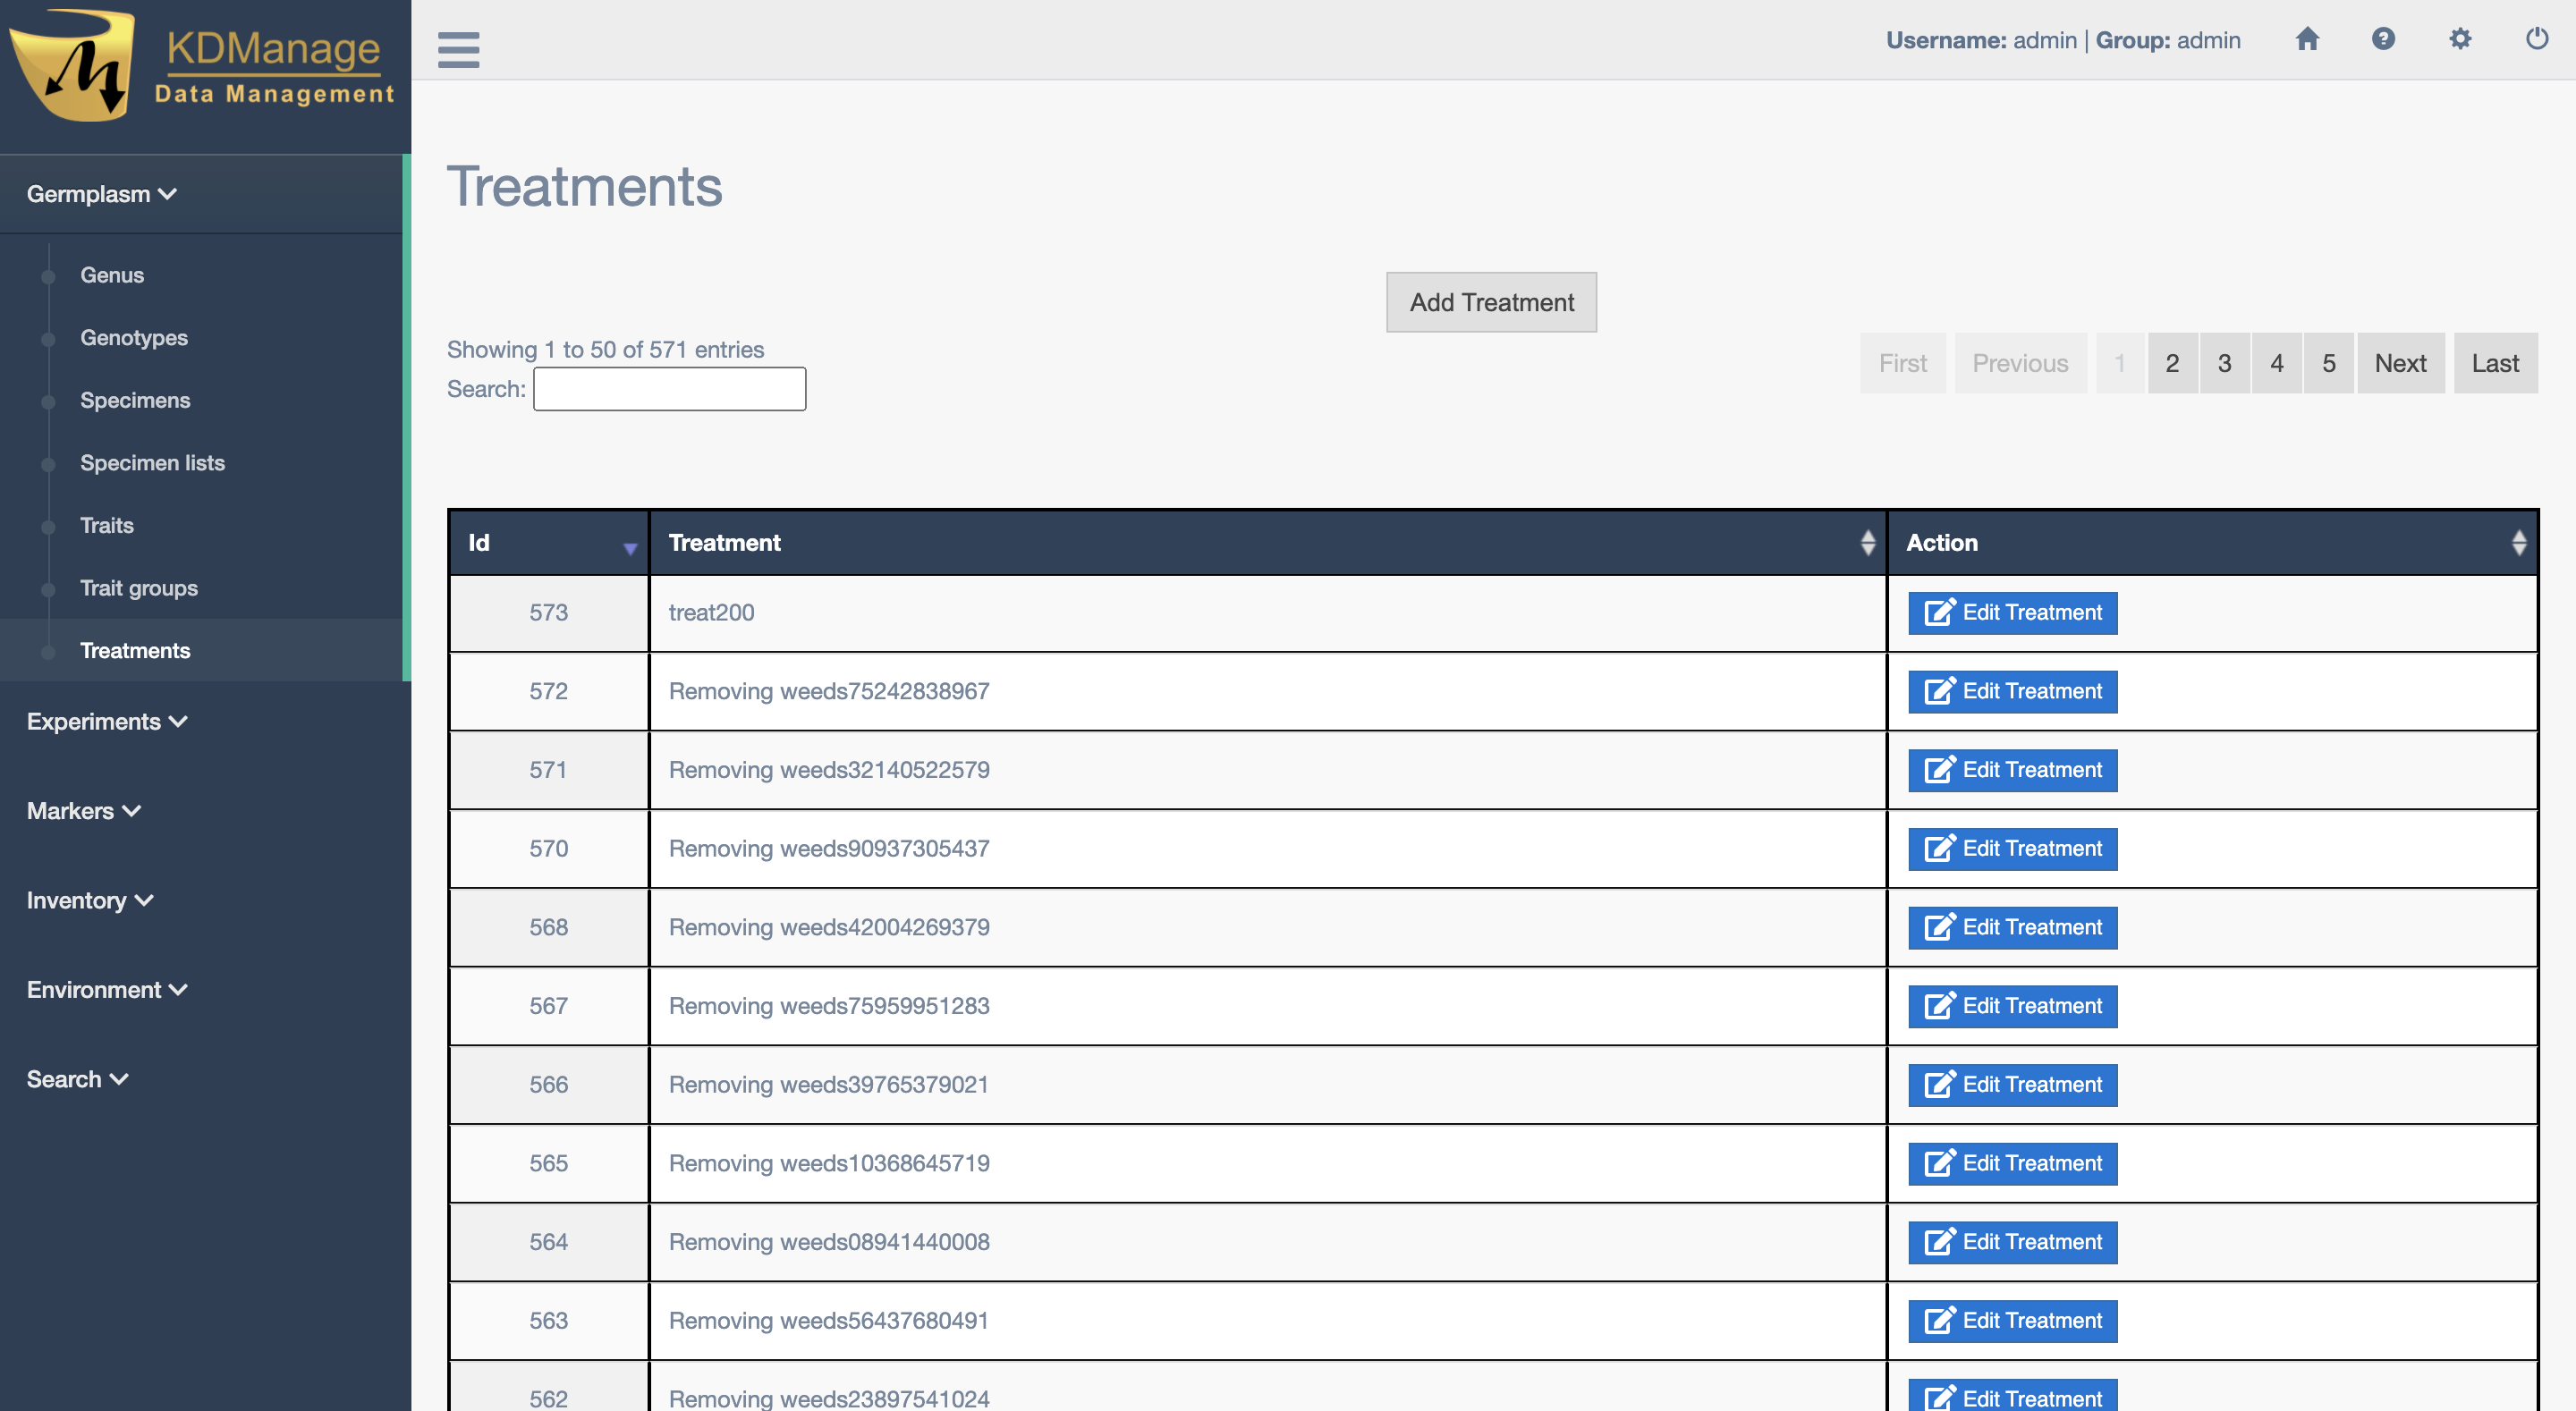
New treatments can be added by selecting the Add Treatment Button which displays the Add Treatment Window as seen in the image below:
